Contributing to Docs
- Technical Documentation Types
- Documents Relevant to Two or More Projects
- Technical Documentation Procedure (Video)
- Technical Documentation Procedure (Text)
- 1. Fork the Repository
- 2. Clone the Fork
- 3. Create New Branch
- 4. Add Upstream
- 5. Code Blocks, Annotations and Table of Contents (ToC)
- 6.1 Checking Your Content - Using NPM
- 6.2 Indexing Your Content
- 6.3 Increasing Search Visibility For Your Content
- 6.4 The Edit On GitHub Button
- 6.5 How To Properly Edit CSS Styles
- 6.6 Checking Your Content - Using Bartholomew’s CLI
- 6.7 Checking Your Content - Preview a Documentation Page on Localhost
- 6.8 Scheduling Menu Items for Timed Release
- 7. Checking Web Pages
- 8. Add Changes
- 9. Commit Changes
- 10. Push Changes
- 11. Create a Pull Request
We are delighted that you are interested in making our developer documentation better. Thank you! We welcome and appreciate contributions of all types — opening issues, fixing typos, adding examples, one-liner code fixes, tests, or complete features.
Any contribution and interaction on any Fermyon project MUST follow our code of conduct. Thank you for being part of an inclusive and open community!
Below are a few pointers designed to help you contribute.
Technical Documentation Types
The following points will help guide your contribution from a resource-type perspective; essentially we would really appreciate you creating and contributing any of the following 4 resource types.
1. Tutorials
Tutorials are oriented toward learning. Tutorials are designed to get a user started on something new (that they have not tried before). You can think of a tutorial as a lesson i.e. teaching a Spin user how to use Redis to persist data. The tutorial may contain many logically ordered steps i.e. installing Spin, installing Redis, using Spin templates, configuring a Spin application and so forth. The desired outcome for a tutorial is for the user to have a working deployment or application. Think of it as a lesson in how to bake a cake.
2. How-To Guides
How-to guides are oriented towards showing a user how to solve a problem, which leads them to be able to achieve their own goal. The how-to guide will follow a series of logical steps. Think of it as providing a recipe for the user’s creativity. For example, you can show a user how to develop a Spin application without telling them what the application must do; that is up to the user’s imagination.
3. Reference
Reference resources are merely a dry description; describing the feature in its simplest form. An example of a reference resource is the Spin application manifest reference. You will notice that the Manifest Reference page simply lists all of the manifest entries and available options.
4. Explanation
An explanation resource is written using a deep-dive approach i.e. providing a deep explanation with the view to impart a deep understanding of a particular concept, feature or product. You may find your contribution is so in-depth that it becomes a long form article like a blog post. If that is the case, please get in touch and we can discuss options around getting your content published on another platform; like the Fermyon Blog.
Tying It All Together
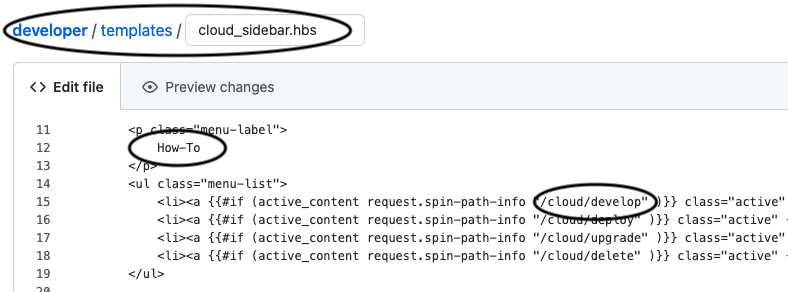
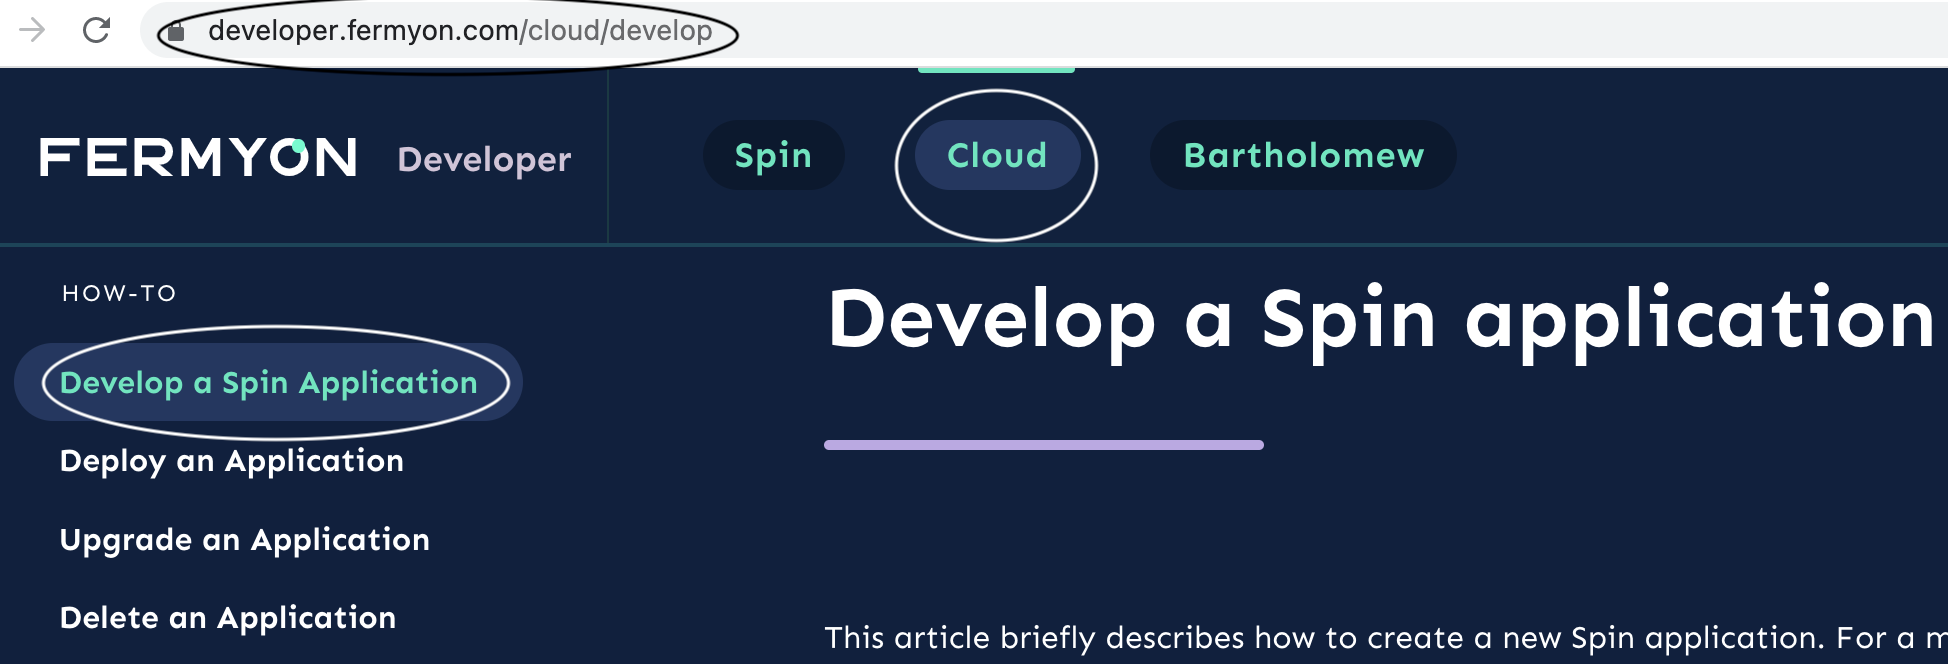
You will notice that the menu system is organized in terms of “Tutorial”, “How-To”, “Reference” and so forth. When you write your contribution please decide which product (Cloud, Spin, Bartholomew) category it falls into and also which resource type it aligns with. Armed with that information you can go ahead and create your new file. For example, your “how-to” resource on “developing a Spin application” in Fermyon cloud would be saved to the content/cloud/ folder; specifically, content/cloud/develop.md and the menu item (for the left-hand-side menu) would be added to the templates/cloud_sidebar.hbs file, as shown below.
The resulting output would be as follows.
Documents Relevant to Two or More Projects
If a document is relevant to two or more projects, the dynamic body feature of bartholomew is to be used. Create the document in one of the projects with the content. In the other project(s) create a file with only the frontmatter. Then add the following field to the frontmatter:
.
.
body_source = "<path to the content>"

[extra]
The value for the body_source key, should be the path from which the content is being shared (relative to the repository’s content folder). For example if the Spin project’s developer/content/spin/v3/contributing-docs.md holds the sharable content (as the single source of truth), then the Cloud project can display that same content by using the following frontmatter:
title = "Contributing to Docs"
template = "cloud_main"
date = "2023-11-04T00:00:01Z"
body_source = "/spin/v3/contributing-docs"

[extra]
url = "https://github.com/fermyon/developer/blob/main/content/cloud/contributing-docs.md"
keywords = "contribute contributing"

---
Note: the
body_source = "/spin/contributing-docs"part of the frontmatter does not need to include the.mdfile extension (as is also the case when hyperlinking via markdown anywhere in a developer documentation file’s body).
Technical Documentation Procedure (Video)
Technical Documentation Procedure (Text)
1. Fork the Repository
The first step is to fork the developer repository, from Fermyon’s GitHub, to your own GitHub account.
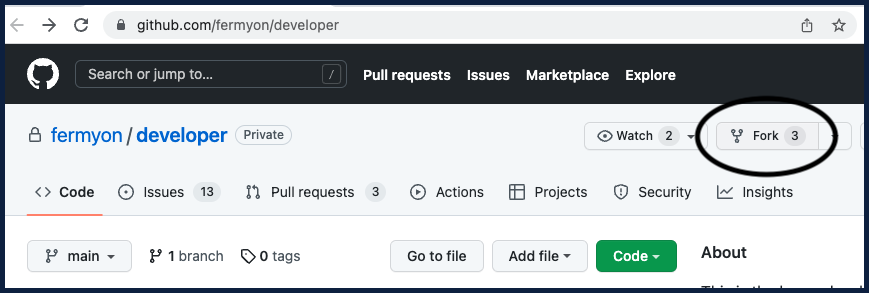
Ensure that you are forking the developer repository to your own GitHub account; where you have full editing privileges.
2. Clone the Fork
Copy the URL from the UI in readiness for running the git clone command.
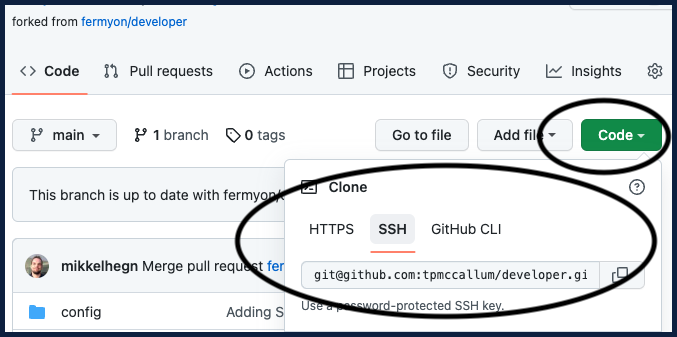
Go ahead and clone the new fork that you just created (the one which resides in your own GitHub account):
$ cd ~
$ git clone git@github.com:yourusername/developer.git
$ cd developer
3. Create New Branch
Create a new branch that will house all of your changes for this specific contribution:
$ git checkout -b my_new_branch
4. Add Upstream
Create a new remote for the upstream (a pointer to the original repository to which you are contributing):
$ git remote add upstream https://github.com/fermyon/developer
5. Code Blocks, Annotations and Table of Contents (ToC)
It is highly recommended that you use either the <!-- @selectiveCpy --> or the <!-- @nocpy --> annotation before each of your code blocks, and that each code block defines the appropriate syntax highlighting. The annotation can be skipped for code blocks with example code snippets i.e. non-terminal or generic output examples.
Selective copy
The selective copy annotation (<!-- @selectiveCpy -->) is intended for use when communicating code and/or CLI commands for the reader to copy and paste. The selective copy annotation allows the reader to see the entire code block (both commands and results) but only copies the lines that start with $ into the reader’s clipboard (minus the $) when the user clicks the copy button. For example, copying the following code block will only copy echo "hello" into your clipboard, for pasting.
$ echo "hello"
hello
Note: If the command, that starts with
$, is deliberately spread over two lines (by escaping the newline character), then the copy mechanism will still copy the second line which is technically still part of that single command.
No copy
The no copy annotation (<!-- @nocpy -->) precedes a code block where no copy and pasting of code is intended. If using the no copy attribute please still be sure to add the appropriate syntax highlighting to your code block (for display purposes). For example:

Please find copyable snippet below, for your convenience:
<!-- @nocpy -->

```text
Some generic code not intended for copying/pasting
```
The above markdown will render the following code block on the web page:
Some generic code not intended for copying/pasting
Non-selective copy - just a straight copy without any additional features.
If you want the code in a code block to be copyable with no “smarts” to remove the $ then you can just simply leave out the annotation altogether. A code block in markdown will be copyable without smarts just as is.
Multi-tab code blocks
Multi-tab code blocks have recently been implemented. Examples can be seen in the Spin installer documentation and Spin Key/Value documentation. The above examples demonstrate how tabs can either represent platforms i.e. Windows, Linux and macOS or represent specific programming languages i.e. Rust, JavaScript and Golang etc. Here is a brief example of how to implement multi-tab code blocks when writing technical documentation for this site, using markdown.
The first step to implementing multi-tab code blocks is placing the enable_shortcodes = true configuration at the start of the .md file. Specifically, in the .md file’s frontmatter.
The markup to create tabs in markdown is as follows
{{ tabs "os" }}

{{ startTab "Windows"}}

To list files on windows use `dir`

<!-- @selectiveCpy -->

\`\`\`bash
$ dir hello_fermyon
\`\`\`
and script in windows have the extension `.bat`

<!-- @nocpy -->

\`\`\`bash
hello.bat
test.bat
\`\`\`

{{ blockEnd }}

{{ startTab "Linux"}}

To list files on linux use `ls`

<!-- @selectiveCpy -->

\`\`\`bash
$ ls
\`\`\`

and script in linux have the extension `.sh`

<!-- @nocpy -->

\`\`\`bash
hello.sh
test.sh
\`\`\`

{{ blockEnd }}
{{ blockEnd }}
Note: Existing documentation will already be using class names for code block tabs and startTab i.e. {{ tabs "os" }} and {{ startTab "Windows"}} respectively. Please consult the following tabs and startTab class names that are already in use (before creating your own). If you need to create a new class name (because one does not already exist) please add it to the list below as part of the pull request that contains your code block contribution.
tabs:
gh-interactosplatformssdk-typespin-versioncloud-plugin-version
startTab
Azure AKSC#Docker DesktopGeneric KubernetesGitHub CLIGitHub UIK3dLinuxmacOSPythonRustTinyGoTypeScriptv0.9.0v0.10.0v1.0.0v1.1.0v1.2.0v0.1.0v0.1.1Windows
The next section covers the highly recommended use of ToCs.
Implementing a Table of Contents (ToC)
If you create content with many headings it is highly recommended to place a ToC in your markdown file. There are excellent extensions (such as this Visual Studio Code Extension called markdown-all-in-one which will automatically generate your ToC).
6.1 Checking Your Content - Using NPM
Once you are satisfied with your contribution, you can programmatically check your content.
If you have not done so already, please go ahead and perform the npm ci (npm clean install) command; to enable Node dependencies such as markdownlint-cli2. Simply run the following command, from the root of the developer repository:
$ npm ci
On top of the Node dependencies the timeout executable must be installed on your system and added to the PATH environment variable. The timeout executable is included in the gnu coreutils package which should be present in most Linux distributions.
On macOS you can install the timeout binary using the Homebrew package manager as shown below:
$ brew install coreutils
Having all dependencies installed, you can now check for broken links (which takes several minutes) and also lint your markdown files. Simply run the following command, from the root of the developer repository:
$ npm run test
Hint: Optionally you can run only the linter with the following command:
# Example of how to lint all Markdown files in a local folder (in this case the spin folder)
npx markdownlint-cli2 content/spin/*.md \"#node_modules\"
# Example of how to lint a local Markdown file
npx markdownlint-cli2 content/spin/install.md \"#node_modules\"
Note: Whilst the npm run test command (which lints and also programmatically checks all URLs) does take extra time to complete it must be utilized before you push changes; preventing the potential pushing of broken URLs to the developer documentation site.
6.2 Indexing Your Content
The developer documentation site implements in-house search. A new index is automatically generated for you when your contribution is merged into the developer documentation repository. This is done via a GitHub action. The following section explains how to alter content to increase search visibility for your content.
6.3 Increasing Search Visibility For Your Content
The built-in search functionality is based on the indexing of individual words in each markdown file, which works well most of the time. However, there are a couple of scenarios where you may want to deliberately increase search visibility for your content.
Word Mismatch
Words in a documentation markdown file may not be words that are searched for by a user. For example, you may write about “different HTTP listening options” whereas a user may only ever try to find that specific content using a search phrase like “alternate port”. If you are aware of typical user search phrases it is always recommended to craft your content to include any predictable user search phrases. However, in the rare case of a mismatch between words in your content and the words a user searches for, you can utilize use the keywords string in the [extra] section of your document’s frontmatter to increase visibility. For example, the following code block shows frontmatter that helps a user find your documentation page (when the user searches for port):
[extra]
keywords = "port ports"
Adding a word to the keywords string of a page overrides the built-in search functionality by at least one order of magnitude. Adding a word to the keywords string may displace other content, so please use it only if necessary.
Homing in on specific content
The keywords string takes users to the start of a page. In some cases, this is not ideal. You may want to home in on specific content to resolve a search query.
If a search term relates to a specific part of a page, you may use the following syntax anywhere in the body of your markdown file, and the user’s search action will direct them straight to the previous heading (nearest heading above the @searchTerm syntax).
<!-- @searchTerm "homing" -->
When using the above @searchTerm feature, please note the following:
- the words must be separated by a space i.e.
- these keywords will be boosted in the search results by at least one order of magnitude; so please use them with caution, so as not to displace other valid pages containing similar content.
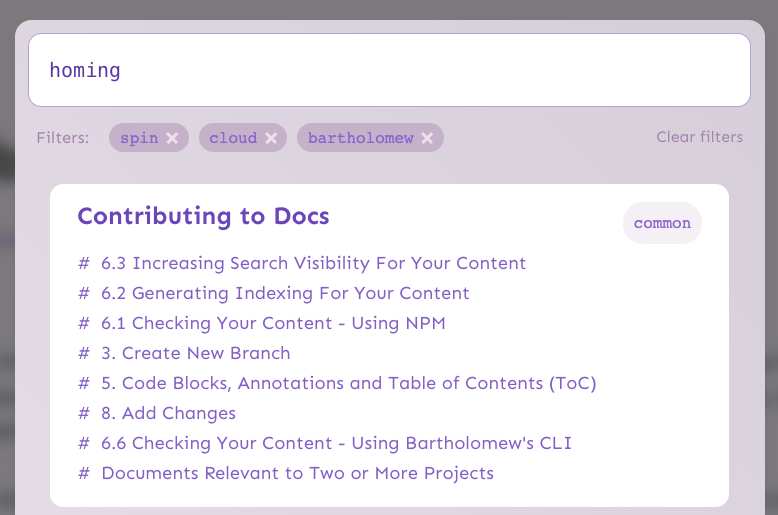
Example: If you search for the word “homing”, the results will point you to the previous heading in this specific section of the developer documentation.
6.4 The Edit On GitHub Button
Each markdown file in the developer documentation requires a link to its GitHub page for the site to correctly render the “Edit on GitHub” button for that page.
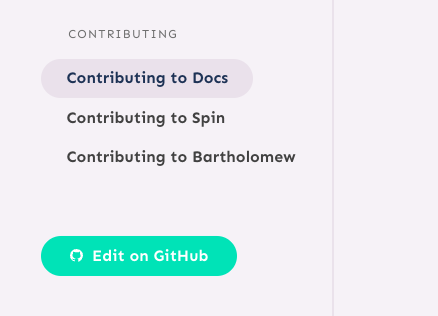
If you create a new markdown file and/or you notice a file without the explicit GitHub URL, please add a URL entry to the [extra] section. For example, the following url is required for this page that you are reading (you can check the raw markdown contents of this page to see this example):
[extra]
url = "https://github.com/fermyon/developer/blob/main/content/spin/v3/contributing-docs.md"
6.5 How To Properly Edit CSS Styles
The following section (the running of the
npm run stylescommand) is not necessary unless you are editing styles i.e. updating.scssfiles, in order to generate new.cssfiles, as part of your contribution.
Directly editing .css files is not recommended, because .css files are overwritten. Instead, if you would like to make and test a new/different style please go ahead and update the appropriate .scss file. The following command will automatically update the .css file that is relevant to the .scss file that you are editing:
$ npm run styles
The above command is designed to be run in the background; enabling you to view your design changes (that are reflected in the .css) while you are editing the .scss in real-time. If you are not running this command in the background (i.e. just deliberately regenerating the .css files once), then the above command can be stopped by pressing Ctrl + C.
6.6 Checking Your Content - Using Bartholomew’s CLI
The Bartholomew Command Line Interface (CLI) Tool is called bart. The bart CLI is a tool that simplifies working with Bartholomew projects (by now you probably already know that Bartholomew is our in-house WebAssembly (Wasm) content management system (CMS) that powers our official Website). And this (our official documentation) site. The bart CLI is handy to ensure quality assurance of new and existing content. Installing the CLI is a cinch, so please go ahead and use it when contributing.
To build the Bartholomew CLI from source perform the following commands:
$ cd ~
$ git clone https://github.com/fermyon/bartholomew.git
$ cd ~/bartholomew
$ make bart
Once built, you will find the bart CLI executable in the ~/bartholomew/target/release directory. However, for convenience it would be a great idea to go ahead and add the bart executable to your system path, for example:
$ sudo mv ~/bartholomew/target/release/bart /usr/local/bin/
Once installed, you can use the CLI’s --help flag to learn more. For example:
$ bart --help
bart 0.6.0
The Bartholomew CLI

USAGE:
    bart <SUBCOMMAND>

FLAGS:
    -h, --help       Prints help information
    -V, --version    Prints version information

SUBCOMMANDS:
    calendar    Print the content calendar for a Bartholomew website
    check       Check content and identify errors or warnings
    help        Prints this message or the help of the given subcommand(s)
    new         Create a new page or website from a template
Let’s take a quick look at how you can use the bart CLI to check any content that you are wanting to contribute.
6.7 Checking Your Content - Preview a Documentation Page on Localhost
You can host your changes to the developer documentation on your own machine (localhost) by using the following spin commands:
$ npm ci
$ cd spin-up-hub
$ npm ci
$ cd ..
$ spin build
$ spin up -e "PREVIEW_MODE=1"
Please note: using the
PREVIEW_MODE=1as part of aspincommand is safe on localhost and allows you to view the content (even if thedatesetting in the content’s.mdis set to a future date). It is often the case that you will be checking content before the publishing date via your system. The developer documentation’s manifest filespin.tomlhas thePREVIEW_MODEset to0i.e.environment = { PREVIEW_MODE = "0" }. Thisspin.tomlfile is correct for a production environment and should always be0(so that the CMS adheres to the publishingdatesetting for content on the public site). Simply put, you can usePREVIEW_MODE=1safely in your command line on your localhost but you should never update thespin.tomlfile (in this regard).
6.8 Scheduling Menu Items for Timed Release
As mentioned above, all pages (.md files) in the documentation have a UTC date i.e. date = "2023-07-25T17:26:00Z". The date is a page scheduling mechanism whereby each page is only displayed if the date has elapsed. Menu items (found in the /developer/templates/*.hbs files) that relate to a scheduled page can also be scheduled (so the specific menu item and its associated page appear at the same time). Simply envelope the menu item with the following if syntax to synchronize the appearance of the menu item with the related page:
{{#if (timed_publish "2023-07-25T17:26:00Z" env.PREVIEW_MODE)}}
    // Scheduled menu item for timed release
{{/if}}
In order to keep the code tidy and readable it is advised to remove the
iflogic (from the.hbsfile) that wraps the content, once thetimed_publishhas elapsed.
7. Checking Web Pages
The bart check command can be used to check the content. Simply pass in the content as a parameter. The developer documentation uses shortcodes, so always pass --shortcodes ./shortcodes as shown below:
$ bart check --shortcodes ./shortcodes content/spin/variables.md
shortcodes: registering alert
shortcodes: registering details
shortcodes: registering tabs
shortcodes: registering startTab
shortcodes: registering blockEnd
✅ content/spin/variables.md
Note:
using a wildcardwill check a whole directory via a single command. For example, runningbart check –shortcodes ./shortcodes content/spin/` will check all markdown files in the Spin project’s documentation section.
8. Add Changes
Once your changes have been checked, go ahead and add your changes by moving to a top-level directory, under which your changes exist i.e. cd ~/developer.
Add your changes by running the following command, from the root of the developer repository:
$ git add
9. Commit Changes
All commits must be signed off and GPG-signed with a GitHub verification key. The rest of this section is primarily for contributors not familiar with signing, and describes how to configure signing, and how to sign commits.
First, ensure that your Git installation is configured sufficiently so that you can --signoff as part of the git commit command. Typically, you need the user.name and user.email to be configured in your Git session. You can check if these are set by typing git config --list.
If you need to set these values please use the following commands:
$ git config user.name "yourusername"
$ git config user.email "youremail@somemail.com"
You must also set up a GPG verification key on your GitHub account, and add this to your Git settings. For more information about setting up a GPG verification key, see GitHub’s documentation about adding a GPG key to your GitHub account and telling your Git client about your GPG key.
With all this set up, type the following commit command, which both signs off (–signoff) and cryptographically signs the data (-S), and leaves a short commit message (-m):
$ git commit -S --signoff -m "Updating documentation"
Note: the
--signoffoption only adds a Signed-off-by trailer by the committer at the end of the commit log message. You must also use the-Soption which will GPG-sign your commits. For more information about GPG-signing commits see the GitHub documentation page for signing commits.
10. Push Changes
At this stage, it is a good idea to just quickly check what GitHub thinks the origin is. For example, if we type git remote -v we can see that the origin is our repo; which we a) forked the original repo into and b) which we then cloned to our local disk so that we could edit:
$ git remote -v
The above command will return output similar to the following:
origin	git@github.com:yourusername/developer.git (fetch)
origin	git@github.com:yourusername/developer.git (push)
upstream	https://github.com/fermyon/developer (fetch)
upstream	https://github.com/fermyon/developer (push)
Once you are satisfied go ahead and push your changes:
$ git push -u origin my_new_branch
11. Create a Pull Request
If you return to your GitHub repository in your browser, you will notice that a PR has automatically been generated for you.
Clicking on the green “Compare and pull request” button will allow you to add a title and description as part of the PR.
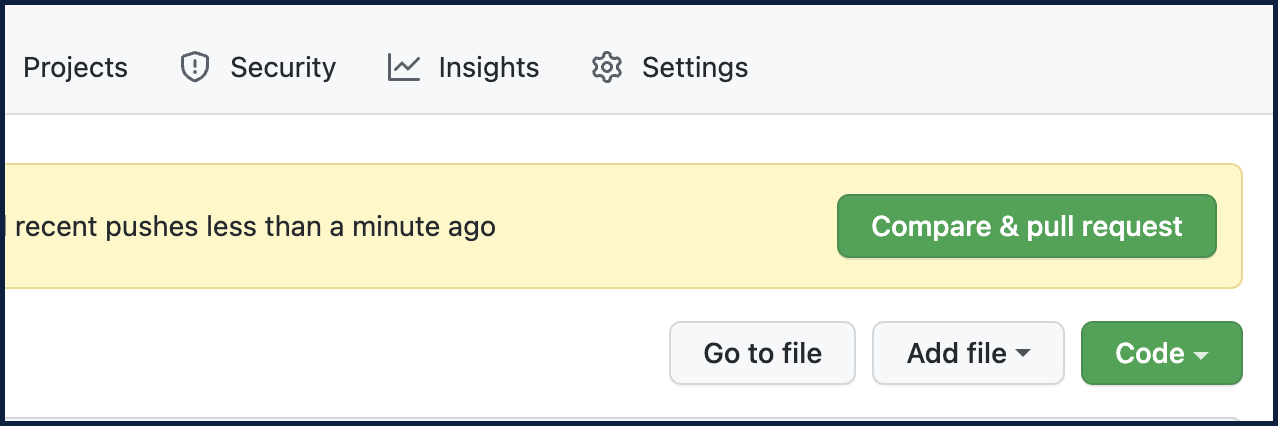
You can also add any information in the textbox provided below the title. For example, screen captures and/or code/console/terminal snippets of your contribution working correctly and/or tests passing etc.
Once you have finished creating your PR, please keep an eye on the PR; answering any questions as part of the collaboration process.
Thank You
Thanks for contributing.


