
Querying relational Databases: MySQL
- Prerequisites
- MySQL
- Spin and Fermyon Wasm Functions
- Using Spin Application Templates
- Creating Our New Spin Application
- Configuration
- Implementing the Spin Application
- Compiling the Spin Application
- Running the Spin Application Locally
- Deploy to Fermyon Wasm Functions
This tutorial guides you through the process of implementing a Spin application to retrieve and store data using a MySQL database powered by Linode Manadged Databases. For demonstration purposes, we’ll implement the application using TypeScript.
Prerequisites
To follow along the instructions of this tutorial, the following is required:
- A MySQL database server deployed on your Linode account
- A client for connecting and interacting with the MySQL database. There are plenty different tool available, as part of this tutorial, we’ll use MySQL Workbench
As we’re going to use TypeScript to for building the application, you must have Node.js installed on your machine as well. We recommend at least Node.js 21.
MySQL
MySQL, is a powerful, open-source relational database system that has earned a strong reputation for reliability, robustness and performance. This tutorial will implement a persistent storage solution for Fermyon Wasm Functions, using MySQL provided by Linode Managed Databases.
Configuring MySQL Database Server Access
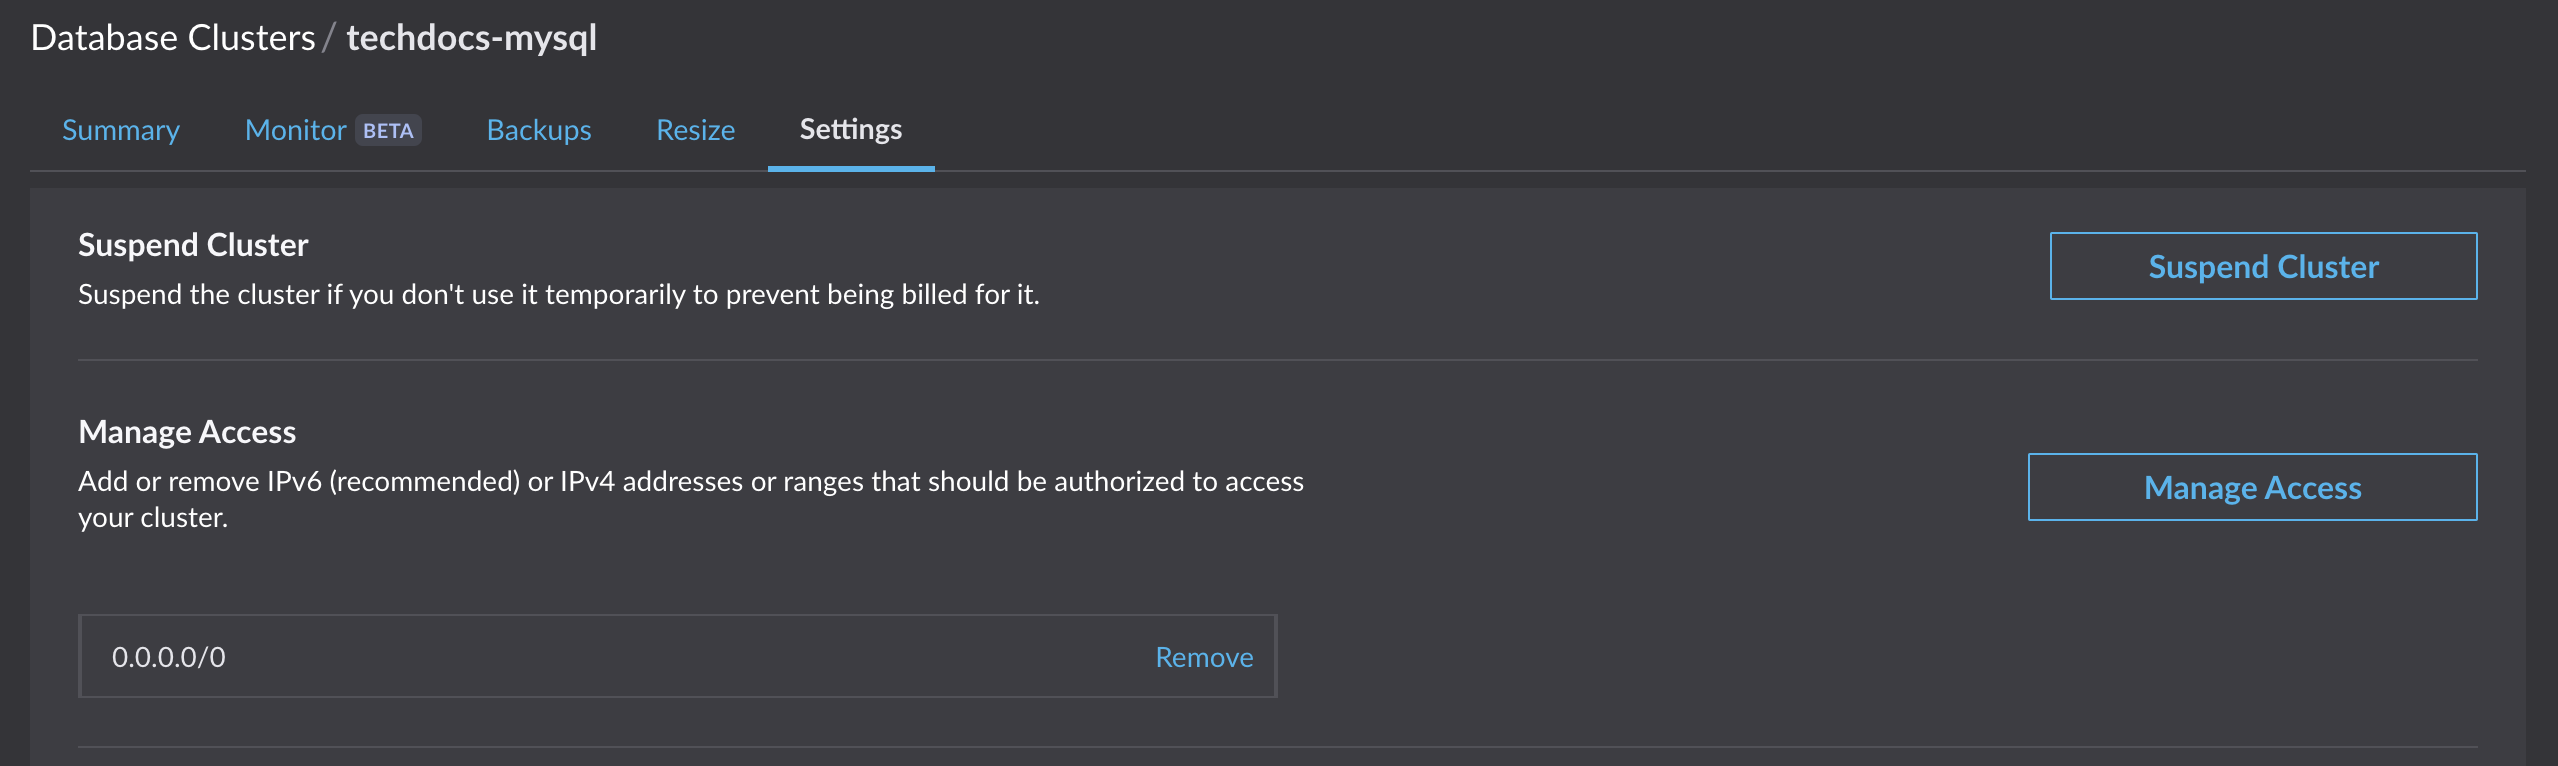
With a MySQL cluster deployed to your Linode account, you must explicitly allow inbound connections using either IPv6 or IPv4 addresses. For the sake of this tutorial and during public preview of Fermyon Wasm Functions, we’ll use the 0.0.0.0/0 CIDR to allow inbound connectivity from any host to the MySQL database server.
You can add the CIDR mentioned above, by browsing to the Settings panel of your MySQL server and clicking the Manage Access button. Once added the 0.0.0.0/0 CIDR and saving the changes, you should see the CIDR being explicitly listed on the settings panel, as shown here:
Provisioning the Database Schema and Seeding Sample Data
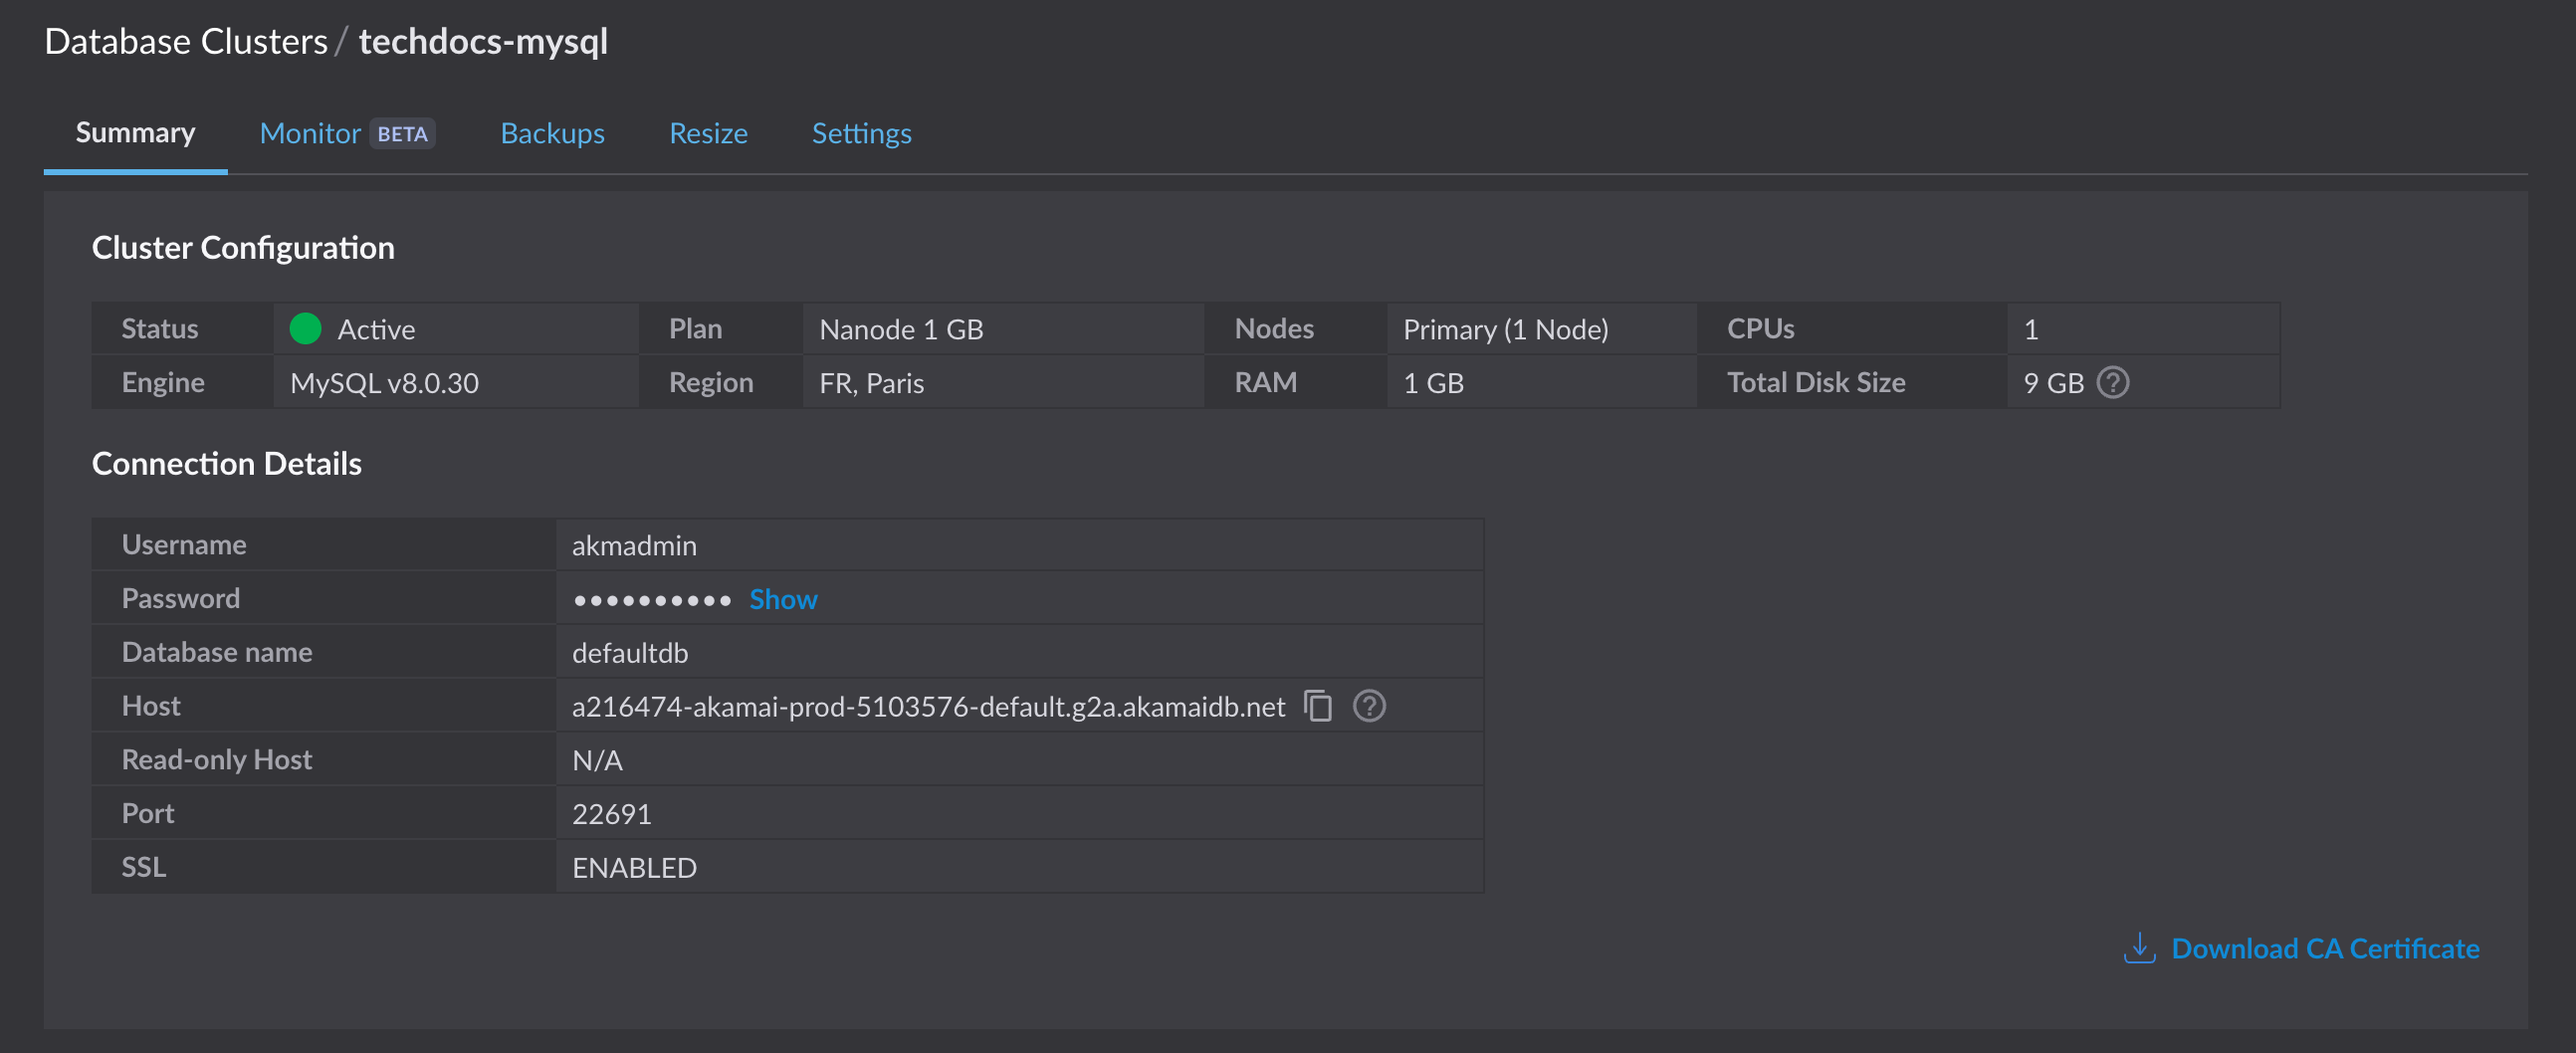
Use the Linode Cloud portal to navigate to the Summary panel of your MySQL server, there you should find necessary information for connecting to your MySQL database using MySQL Workbench.
Once connected to your MySQL database, we’ll set the default database and create a Products table. Copy the following SQL statements to the MySQL Workbench Query window, and execute it using the ⚡️ button.
USE defaultdb;

CREATE TABLE IF NOT EXISTS Products (
  Id varchar(36) PRIMARY KEY,
  Name TEXT NOT NULL,
  Price DOUBLE PRECISION);
Next, execute the following SQL command to insert some sample products in the products table:
INSERT INTO Products (Id, Name, Price)
SELECT 'faac630e-a645-4459-9d7e-751df4016a6e', 'V-Neck T-Shirt', 19.99
WHERE NOT EXISTS (SELECT Id FROM Products WHERE Id = 'faac630e-a645-4459-9d7e-751df4016a6e');

INSERT INTO Products (Id, Name, Price)
SELECT 'c01dce8a-3a50-4ef6-a0f1-7f9f48a238c8', 'Hoodie with Logo', 79.99
WHERE NOT EXISTS (SELECT Id FROM Products WHERE Id = 'c01dce8a-3a50-4ef6-a0f1-7f9f48a238c8');

INSERT INTO Products (Id, Name, Price)
SELECT '6f062dc2-bbf2-4c6c-8169-3511462cd54b', 'Belt', 14.99
WHERE NOT EXISTS (SELECT Id FROM Products WHERE Id = '6f062dc2-bbf2-4c6c-8169-3511462cd54b');
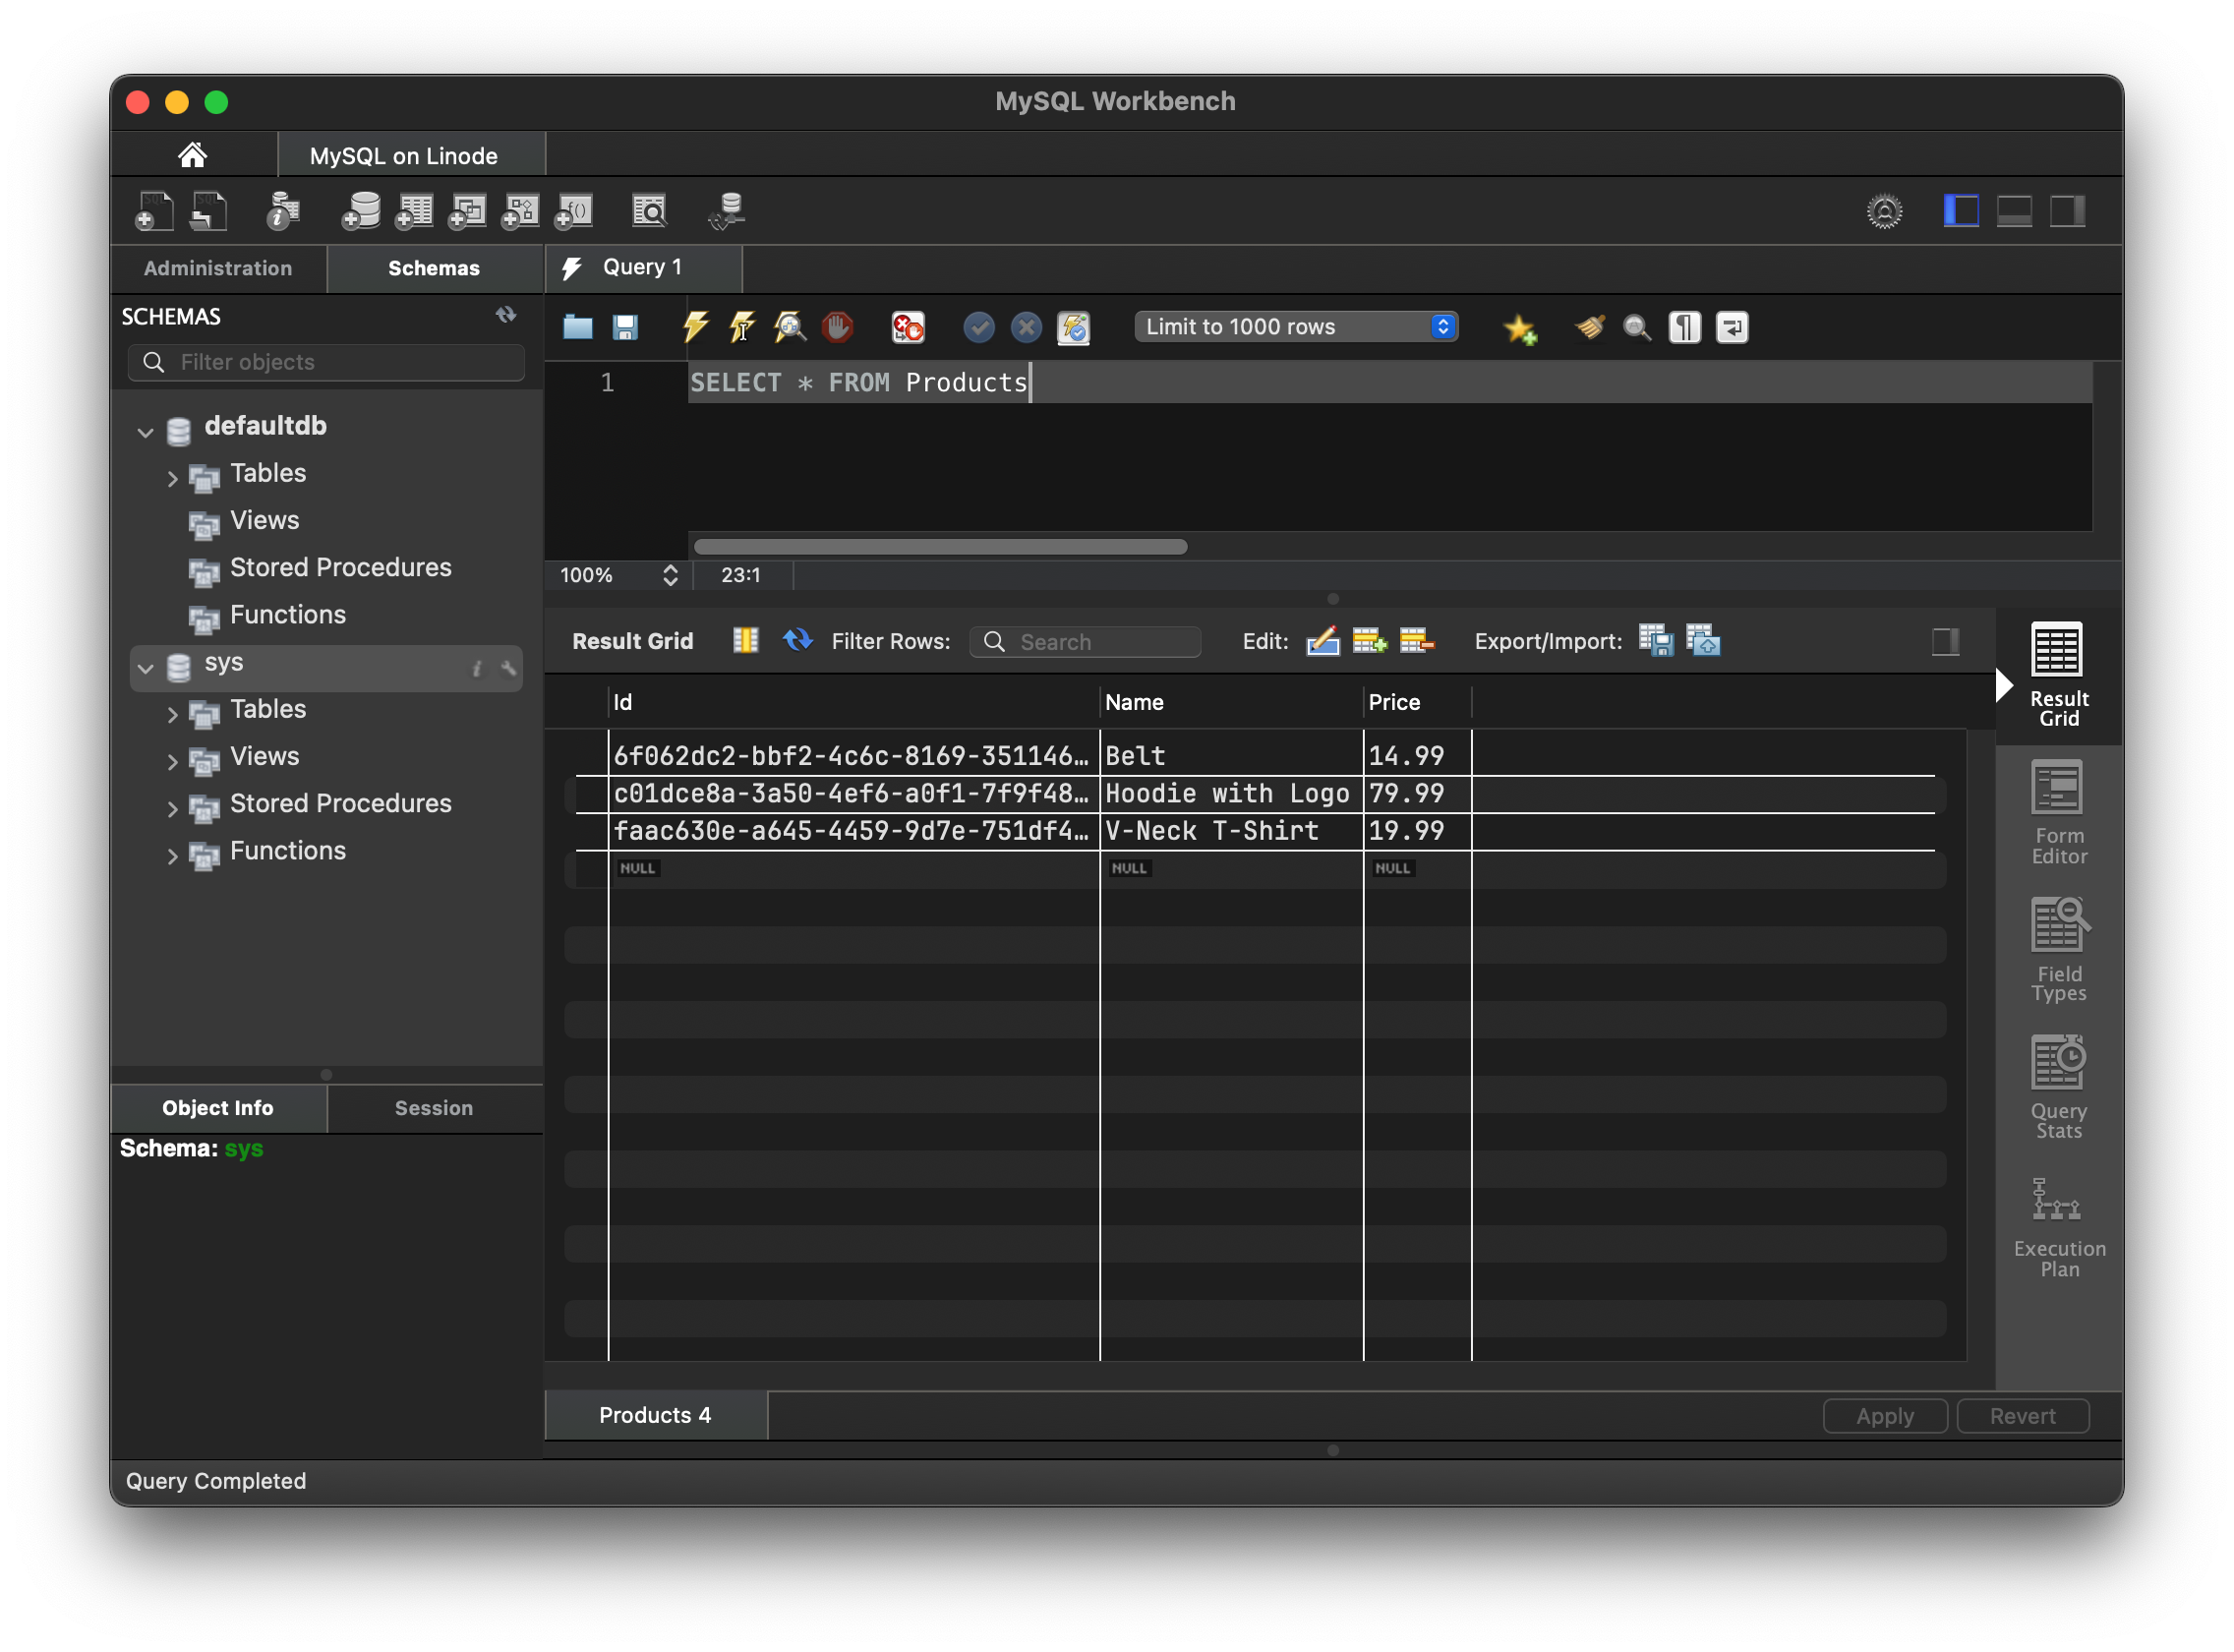
Once you’ve executed the SQL statements from above, you can run a SELECT * FROM Products to verify your database setup. In MySQL Workbench, you should see all products being listed, similar to the following figure:
Spin and Fermyon Wasm Functions
First, you need to have the spin CLI and the aka plugin installed on your computer. Please use the official Fermyon Wasm Functions Quickstart to:
- Install Spin on your machine
- Install the
akaplugin for Spin - log in to Fermyon Wasm Functions
Using Spin Application Templates
The spin CLI facilitates the creation of new Spin applications through the use of application templates. You can install Spin application templates using the official Spin CLI documentation. The template we are interested in, for this tutorial, is the http-ts template.
Creating Our New Spin Application
The official spin CLI documentation also has instructions on how to create a new Spin application, from an existing template. Using the docs as a reference, we can create a new Spin application based on the http-ts template, move into the application directory and install its dependencies as shown here:
$ spin new -t http-ts -a linode-mysql

$ cd linode-mysql

$ npm install @spinframework/spin-mysql @spinframework/spin-variables
Note: The above npm install command installs the default packages in the template as well as the @spinframework/spin-mysql and @spinframework/spin-variables required for this tutorial.
Configuration
Open the Spin application’s spin.toml file, add a set of application variables and link them to the linode-mysql component. This allows modifying the connection string for the MySQL database without changing the actual source code. Consult the Spin documentation to learn more about using variables in Spin.
[variables]
mysql_host = { required = true }
mysql_user = { required = true }
mysql_password = { required = true, secret = true }
mysql_port = { required = true }
mysql_database = { required = true }

[component.linode-mysql.variables]
mysql_connection_string = "mysql://{{ mysql_user}}:{{ mysql_password }}@{{ mysql_host }}:{{ mysql_port }}/{{ mysql_database }}"
You will also need to explicitly add the address of your MySQL endpoint to the manifest, so that the Wasm component is allowed to send network requests to it. See the following example, that defines the allowed_outbound_hosts property within the component configuration ([component.linode-mysql]) section.
Caution: Please recognize that for outbound connectivity we must specify the protocol to be
mysql://and explicitly add the MySQL port configured on your Linode Managed MySQL server (e.g.22691) as shown here:
[component.linode-mysql]
source = "dist/linode-mysql.wasm"
exclude_files = ["**/node_modules"]
allowed_outbound_hosts = ["mysql://{{ mysql_host }}:{{ mysql_port }}"]
Implementing the Spin Application
The application we’re going to implement will provide common CRUD (Create, Read, Update, Delete) operations to interact with products stored in MySQL using HTTP requests. Besides Spin SDK for TypeScript, our application will also use the uuid package as a dependency. To install it, execute the following command from within the application directory:
$ npm install uuid --save
Note: For the sake of simplicity, we will place all TypeScript code in the
index.tsfile generated byspin new. Delete its contents and keep on appending the TypeScript snippets shown as part of this tutorial.
We’ll start with importing necessary capabilities, defining application constants, two helper functions, and laying out the HTTP API of our Spin application using the AutoRouter provided by the itty-router module:
import * as Variables from "@spinframework/spin-variables";
import * as Mysql from "@spinframework/spin-mysql";
import { AutoRouter } from "itty-router";
import { v4 as uuidv4 } from 'uuid';
import { validate as uuidValidate } from 'uuid';

const router = AutoRouter();
const decoder = new TextDecoder();

// define application constants
const SQL_CREATE = "INSERT INTO Products (Id, Name, Price) VALUES (?, ?, ?)";
const SQL_READ_ALL = "SELECT Id, Name, Price from Products ORDER BY Name";
const SQL_READ_BY_ID = "SELECT Id, Name, Price from Products WHERE Id = ?";
const SQL_UPDATE_BY_ID = "UPDATE Products SET Name = ?, Price = ? WHERE Id = ?";
const SQL_DELETE_BY_ID = "DELETE FROM Products WHERE Id = ?";
const DEFAULT_HEADERS = {
  "content-type": "application/json"
};

// helper function to quickly respond with an HTTP 400
function badRequest(message: string) {
    return new Response(JSON.stringify({ message }), { status: 400, headers: DEFAULT_HEADERS });
}

// helper function to quickly respond with a 404
function notFound(message: string) {
    return new Response(JSON.stringify({ message }), { status: 404, headers: DEFAULT_HEADERS });
}

// Layout the HTTP API

router
    // C(reate) -> Add a new product
    .post("/products", async (request, { connectionString }) => createProduct(await request.arrayBuffer(), connectionString))
    // R(ead) -> Read all products
    .get("/products", async (_, { connectionString }) => readAllProducts(connectionString))
    // R(ead) -> Read a single product using its identifier
    .get("/products/:id", async ({ params }, { connectionString }) => readProductById(params.id, connectionString))
    // U(pdate) -> Update a product using its identifier
    .put("/products/:id", async (request, { connectionString }) => updateProductById(request.params.id, await request.arrayBuffer(), connectionString))
    // D(elete) -> Delete a product using its identifier
    .delete("/products/:id", async ({ params }, { connectionString }) => deleteProductById(params.id, connectionString))
    .all("*", () => notFound("Endpoint not found"));

// Spin application entry point
//@ts-ignore
addEventListener('fetch', async (event: FetchEvent) => {
    // if the connection string is not set, return early with a HTTP 500
    const connectionString = Variables.get("mysql_connection_string");
    if (!connectionString) {
        event.respondWith(new Response(
          JSON.stringify({ message: "Connection String not specified" }),
            { status: 500, headers: DEFAULT_HEADERS }
          ));
    }

    // Let the HTTP router handle incoming requests
    // pass the connection string as extra
    event.respondWith(router.fetch(event.request, { connectionString }));
});
Implementing the Create Handler
With the design of the HTTP API in place, we could move on and start implementing the different scenarios. First, let’s start by implementing the createProduct function, which is responsible for persisting new products in the MySQL database using Mysql APIs provided through the Spin SDK for TypeScript:
function createProduct(requestBody: ArrayBuffer, connectionString: string) {

  // validate the request payload
  let payload = JSON.parse(decoder.decode(requestBody));

  // if payload does not match the expectations, return early by sending an HTTP 400
  if (!payload || !payload.name || typeof payload.price != "number") {
    return badRequest("Invalid payload received. Expecting {\"name\":\"some name\", \"price\": 9.99}");
  }

  // construct a new Product using user provided data and
  // by rolling a new UUID
  const newProduct = {
    id: uuidv4(),
    name: payload.name,
    price: payload.price
  };

  // Open the MySQL connection
  const connection = Mysql.open(connectionString);

  // Persist the new product in database
  connection.execute(SQL_CREATE, [newProduct.id, newProduct.name, newProduct.price]);

  // Create an HTTP 201 (Created) response
  let customHeaders = {
    "Location": `/products/${newProduct.id}`
  };
  Object.assign(customHeaders, DEFAULT_HEADERS);

  return new Response(JSON.stringify(newProduct), { status: 201, headers: customHeaders });
}
Implementing the Read Handlers
Our Spin application has two different handlers for reading data. The readAllProducts is responsible for returning the list of all products from the MySQL database, whereas the readProductById is used to retrieve a single product from the database using its identifier. Let’s start by looking at the readAllProducts function:
function readAllProducts(connectionString: string) {
  // open MySQL connection
  const connection = Mysql.open(connectionString);

  // load all products from the database
  let result = connection.query(SQL_READ_ALL, []);
  // iterate over each row received
  let items = result.rows.map(row => {
    // and construct a TypeScript object containing the data of a particular product
    return {
      id: row["Id"],
      name: row["Name"],
      price: +row["Price"]!.toString()
    };
  });

  // Create an HTTP response with status code 200
  return new Response(JSON.stringify(items), { status: 200, headers: DEFAULT_HEADERS });
}
In contrast, the readProductById handler, validates potential UUIDs provided by the corresponding route parameter. If a request was sent to the API with a mal-formatted UUID, the request will be terminated early and an HTTP 400 (Bad Request) is returned to the callee:
function readProductById(id: string, connectionString: string) {
  // validate UUID
  if (!uuidValidate(id)) {
    return badRequest("Invalid identifier received via URL");
  }

  // open MySQL connection
  let connection = Mysql.open(connectionString);

  // retrieve a product using its identifier
  let result = connection.query(SQL_READ_BY_ID, [id]);

  // if we receive 0 rows, respond to the request with an HTTP 404 (Not Found)
  if (result.rows.length == 0) {
    return notFound("Product not found");
  }

  let found = {
    id: result.rows[0]["Id"],
    name: result.rows[0]["Name"],
    price: +result.rows[0]["Price"]!.toString()
  };

  // Create an HTTP 200 response
  return new Response(JSON.stringify(found), { status: 200, headers: DEFAULT_HEADERS });
}
Implementing the Update Handler
Next on our list is updating an existing product in the database. Again, we’ll take the product identifier from the corresponding route parameter. Additionally, we pass the request payload into the updateProductById, which we’ll use to update individual properties of the product in the database.
function updateProductById(id: string, requestBody: ArrayBuffer, connectionString: string) {
  // validate UUID
  if (!uuidValidate(id)) {
    return badRequest("Invalid identifier received via URL");
  }
  // validate the payload
  let payload = JSON.parse(decoder.decode(requestBody));
  if (!payload || !payload.name || typeof payload.price != "number") {
    return badRequest("Invalid payload received. Expecting {\"name\":\"some name\", \"price\": 9.99}");
  }

  // construct the updated product
  const product = {
    id: id,
    name: payload.name,
    price: payload.price
  };

  // open MySQL connection
  const connection = Mysql.open(connectionString);
  const updatedRows = connection.execute(SQL_UPDATE_BY_ID, [product.name, product.price, product.id]);

  // if update did not affect any rows, return a not found
  if (updatedRows == 0) {
    return notFound("Product not found");
  }

  // construct a HTTP 200 response
  let customHeaders = {
    "Location": `/items/${id}`
  }
  Object.assign(customHeaders, DEFAULT_HEADERS);

  return new Response(JSON.stringify(product), { status: 200, headers: customHeaders });
}
Implementing the Delete Handler
Last, but not least let’s take care of deleting a product from the MySQL database. The deleteProductById function takes the product identifier from the route parameter, validates it and tries to delete the product from the database. If no rows were affected from the delete operation, we will again return an HTTP 404 (Not Found), otherwise we respond with a 204 (No Content):
function deleteProductById(id: string, connectionString: string) {
  // validate UUID
  if (!uuidValidate(id)) {
    return badRequest("Invalid identifier received via URL");
  }

  // open MySQL connection
  const connection = Mysql.open(connectionString);
  const deletedRows = connection.execute(SQL_DELETE_BY_ID, [id]);

  // if delete did not affect any rows, return a not found
  if (deletedRows == 0) {
    return notFound("Product not found");
  }

  // construct a HTTP 204 response
  return new Response(null, { status: 204 });
}
Compiling the Spin Application
To build the application, use the following command:
$ spin build
The output from the above command will look similar to the following:
Building component linode-mysql with `npm install`

up to date, audited 277 packages in 409ms

50 packages are looking for funding
  run `npm fund` for details

found 0 vulnerabilities
Building component linode-mysql with `npm run build`

> linode-mysql@1.0.0 build
> npx webpack --mode=production && npx mkdirp dist && npx j2w -i build/bundle.js -d build/wit/knitwit -n combined -o dist/linode-mysql.wasm

...
Component successfully written.
Finished building all Spin components
Running the Spin Application Locally
Let’s run the Spin application on your local machine, before we will deploy it to Fermyon Wasm Functions. Although you might be familiar with the spin up command already, we have to provide information for connecting to our MySQL database, by setting the corresponding variables in advance of running spin up.
Environment variables prefixed with SPIN_VARIABLE_ will be accessible by your applications, if a corresponding variable is defined as part of the application manifest (spin.toml).
At the beginning of this tutorial, we added some variables to the application manifest (spin.toml), meaning we could now follow the pattern, set the SPIN_VARIABLE_MYSQL_HOST, etc. to tell our application how the database connection should be established and run the application with spin up:
$ export SPIN_VARIABLE_MYSQL_HOST=<YOUR_MYSQL_HOST_HERE>
$ export SPIN_VARIABLE_MYSQL_PORT=<YOUR_MYSQL_PORT_HERE>
$ export SPIN_VARIABLE_MYSQL_USER=<YOUR_MYSQL_USER_HERE>
$ export SPIN_VARIABLE_MYSQL_PASSWORD=<YOUR_MYSQL_PASSWORD_HERE>
$ export SPIN_VARIABLE_MYSQL_DATABASE=<YOUR_MYSQL_DATABASE_HERE>

$ spin up
Executing the command above will produce a similar output to the following:
Logging component stdio to ".spin/logs/"

Serving http://127.0.0.1:3000
Available Routes:
  linode-mysql: http://127.0.0.1:3000 (wildcard)
Use a tool like curl to send a GET request to the /products endpoint at http://localhost:3000 to retrieve the list of all products from the MySQL database:
$ curl -iX GET http://localhost:3000/products
In addition to the response body (a JSON array containing all the products), you should see response headers printed to stdout similar to this:
HTTP/1.1 200 OK
content-type: application/json
content-length: 245
date: Thu, 30 Jan 2025 11:46:11 GMT

[{"id":"6f062dc2-bbf2-4c6c-8169-3511462cd54b","name":"Belt","price":14.99},{"id":"c01dce8a-3a50-4ef6-a0f1-7f9f48a238c8","name":"Hoodie with Logo","price":79.99},{"id":"faac630e-a645-4459-9d7e-751df4016a6e","name":"V-Neck T-Shirt","price":19.99}]
Deploy to Fermyon Wasm Functions
To deploy the application to Fermyon Wasm Functions, use the spin aka deploy command. The actual connection information for accessing the MySQL database will be passed to the command using multiple --variable flags:
$ spin aka deploy \
  --variable mysql_host="<YOUR_MYSQL_HOST_HERE>" \
  --variable mysql_port="<YOUR_MYSQL_PORT_HERE>" \
  --variable mysql_user="<YOUR_MYSQL_USER_HERE>" \
  --variable mysql_password="<YOUR_MYSQL_PASSWORD_HERE>" \
  --variable mysql_database="<YOUR_MYSQL_DATABASE_HERE>"
The above deploy command will produce similar output to the following:
Name of new app: linode-mysql
Creating new app linode-mysql in account your-account
Note: If you would instead like to deploy to an existing app, cancel this deploy and link this workspace to the app with `spin aka app link`
OK to continue? yes
Workspace linked to app linode-mysql
Waiting for app to be ready... ready

App Routes:
- linode-mysql: https://ec8a19d8-6d10-4056-bb69-cc864306b489.aka.fermyon.tech (wildcard)
Finally, you can use curl to interact with the application you just deployed to Fermyon Wasm Functions. First, let’s send a GET request to the /products endpoint to retrieve a list of all products:
$ curl https://8d332abd-5f9e-4943-aaaa-60c219213410.aka.fermyon.tech/products
You should now see a JSON array containing all products being rendered to your terminal as shown here:
[
  {
    "id": "6f062dc2-bbf2-4c6c-8169-3511462cd54b",
    "name": "Belt",
    "price": 14.99
  },
  {
    "id": "c01dce8a-3a50-4ef6-a0f1-7f9f48a238c8",
    "name": "Hoodie with Logo",
    "price": 79.99
  },
  {
    "id": "faac630e-a645-4459-9d7e-751df4016a6e",
    "name": "V-Neck T-Shirt",
    "price": 19.99
  }
]
For demonstration purposes, let’s also add a new product to the database by sending a POST request to the /products endpoint:
$ curl -iX POST -H 'content-type: application/json' \
  -d '{"name": "Plain Hoodie", "price": 42.99}' \
  https://8d332abd-5f9e-4943-aaaa-60c219213410.aka.fermyon.tech/products
Because we passed the -i flag to the curl command above, you should also see all response headers (including the HTTP status code) returned from our application running on Fermyon Wasm Functions:
HTTP/1.1 201 Created
content-type: application/json
location: /products/660f8927-cdc1-44c7-bdd1-f4926dbd8445
content-length: 81
date: Tue, 21 Jan 2025 09:36:24 GMT

{"id":"660f8927-cdc1-44c7-bdd1-f4926dbd8445","name":"Plain Hoodie","price":42.99}
Congratulations 🎉, you implemented a fully functional CRUD application and deployed it to Fermyon Wasm Functions using Spin and TypeScript.