
Let's get started
- Install Spin
- Install the
akaPlugin for Spin - Install Language Specific Tooling
- Create a New Spin Application
- Compile the Application
- Test the Application Locally
- Log in to the Fermyon Wasm Functions
- Deploy the Application
- Success
- Next Steps
This quickstart requires access to the public preview of Fermyon Wasm Functions. If you haven’t already requested access, please do so first by completing this short form. The Fermyon team will review your request and follow up shortly.
Fermyon Wasm Functions is the platform for running Spin applications inside of the Akamai Connected Cloud. For more details on limitations and support policy, check out the FAQ.
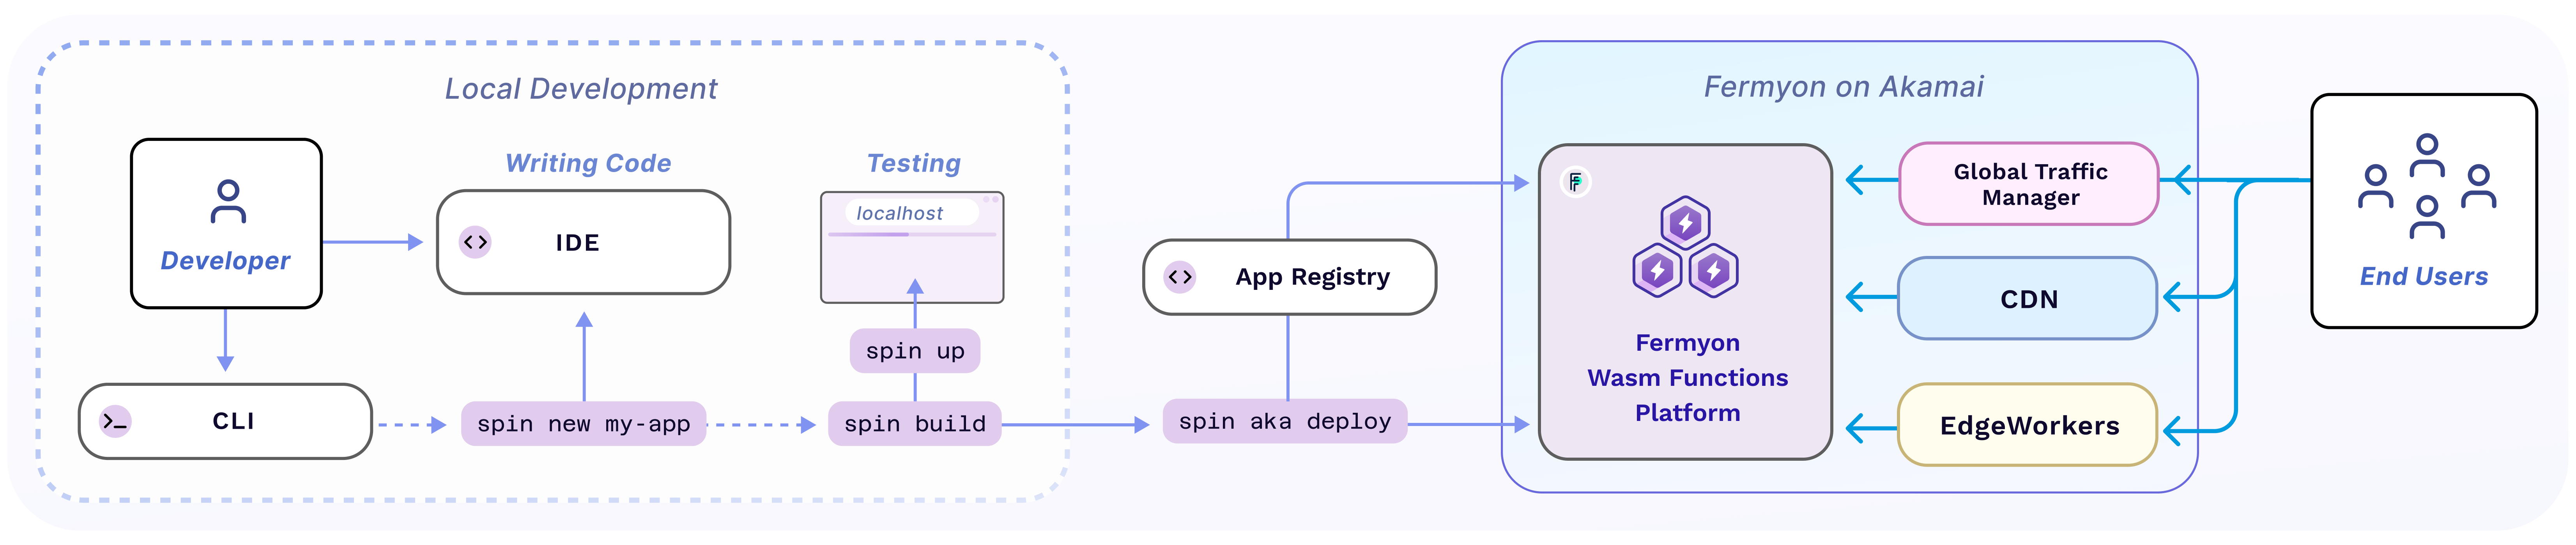
This guide will get you up and running with Fermyon Wasm Functions in less than two minutes. To do so, we’ve already made a Spin application ready for you to deploy to Fermyon Wasm Functions.
Install Spin
Download the spin binary using the install.sh script hosted on this site:
$ curl -fsSL https://developer.fermyon.com/downloads/fwf_install.sh | bash
Then move the spin binary somewhere in your path, so you can run it from anywhere. For example:
$ sudo mv ./spin /usr/local/bin/spin
Download the spin binary using the install.sh script hosted on this site:
$ curl -fsSL https://wasm-functions.fermyon.app/downloads/install.sh | bash
Then move the spin binary somewhere in your path, so you can run it from anywhere. For example:
$ sudo mv ./spin /usr/local/bin/spin
Download the Windows binary release of Spin from GitHub.
Unzip the binary release and place the spin.exe in your system path.
Learn more
Spin is an open-source project used for creating, developing, building, running, and deploying Spin applications. It is both a CLI tool and a runtime, and provides SDKs for a variety of programming languages, including, but not limited to, Rust, TinyGo, and C#.
The Spin project provides installers that are supported on Linux (amd64), macOS (amd64 and arm64), and Windows(amd64).
The Spin documentation is a good starting place to learn more about using the framework to develop applications.
Install the aka Plugin for Spin
In order to interact with Fermyon Wasm Functions (Login, Deploy, etc), you need to install the Fermyon Wasm Functions for Akamai Spin plugin (aka). The plugin can be installed using this command:
$ spin plugin install aka
Install Language Specific Tooling
With Spin you can build applications using a wide variety of different programming languages. This quickstart, contains instructions and samples for JavaScript, TypeScript and Rust.
Language specific tooling must be installed on your machine, follow these installation instructions:
To build Spin apps with JavaScript, Node.js must be installed on your system. Head over to https://nodejs.org/en/download, to download Node.js.
Once Node.js is installed on your machine, you can check its version using the following command:
node --version
v22.13.0
We recommend Node.js version 22 (or newer).
To build Spin apps with TypeScript, Node.js must be installed on your system. Head over to https://nodejs.org/en/download, to download Node.js.
Once Node.js is installed on your machine, you can check its version using the following command:
node --version
v22.13.0
We recommend Node.js version 22 (or newer).
To build Spin apps with Rust, Rust tooling must be installed on your machine. Head over to https://www.rust-lang.org/tools/install, to find detailed installation instructions for your operating system.
Once Rust tooling is installed, you’ll need the wasm32-wasip1 target for Rust.
$ rustup target add wasm32-wasip1
You’ll need the TinyGo compiler, as the standard Go compiler does not yet support WASI exports. See the TinyGo installation guide.
Create a New Spin Application
Next we’ll prepare an application with Spin. You can write an app from scratch or use an existing template. The Spin Hub has many reference examples and templates:
For the purposes of this guide, we’ll use existing code - with the spin new CLI command along with a hello-spin template to create a new application:
$ spin new -t http-js --accept-defaults hello-spin
The http-js template creates the application boilerplate for you. Once it has finished change to the application directory (hello-spin):
$ cd hello-spin
From within the application directory install the necessary dependencies using your package manager of choice (we will use npm here):
$ npm install
The http-js template generates an idiomatic JavaScript application. Take a few seconds and explore the source code generated by the template in src/index.js:
// For AutoRouter documentation refer to https://itty.dev/itty-router/routers/autorouter
import { AutoRouter } from 'itty-router';

let router = AutoRouter();

// Route ordering matters, the first route that matches will be used
// Any route that does not return will be treated as a middleware
// Any unmatched route will return a 404
router
    .get("/", () => new Response("hello universe"))
    .get('/hello/:name', ({ name }) => `Hello, ${name}!`)

addEventListener('fetch', async (event) => {
    event.respondWith(router.fetch(event.request));
});
$ spin new -t http-ts --accept-defaults hello-spin
The http-ts template creates the application boilerplate for you. Once it has finished change to the application directory (hello-spin):
$ cd hello-spin
From within the application directory install the necessary dependencies using your package manager of choice (we will use npm here):
$ npm install
The http-ts template generates an idiomatic TypeScript application. Take a few seconds and explore the source code generated by the template in src/index.ts:
// For AutoRouter documentation refer to https://itty.dev/itty-router/routers/autorouter
import { AutoRouter } from 'itty-router';

let router = AutoRouter();

// Route ordering matters, the first route that matches will be used
// Any route that does not return will be treated as a middleware
// Any unmatched route will return a 404
router
    .get("/", () => new Response("hello universe"))
    .get('/hello/:name', ({ name }) => `Hello, ${name}!`)

//@ts-ignore
addEventListener('fetch', async (event: FetchEvent) => {
    event.respondWith(router.fetch(event.request));
});
$ spin new -t http-rust --accept-defaults hello-spin
The http-rust template creates the application boilerplate for you. Once it has finished change to the application directory (hello-spin):
$ cd hello-spin
The http-rust template generates an idiomatic Rust application. Take a few seconds and explore the source code generated by the template in src/lib.rs:
use spin_sdk::http::{IntoResponse, Request, Response};
use spin_sdk::http_component;

/// A simple Spin HTTP component.
#[http_component]
fn handle_hello_spin(req: Request) -> anyhow::Result<impl IntoResponse> {
    println!("Handling request to {:?}", req.header("spin-full-url"));
    Ok(Response::builder()
        .status(200)
        .header("content-type", "text/plain")
        .body("Hello, Fermyon")
        .build())
}
$ spin new -t http-go --accept-defaults hello-spin
The http-go template creates the application boilerplate for you. Once it has finished change to the application directory (hello-spin):
$ cd hello-spin
The http-go template generates an idiomatic Go(lang) application. Take a few seconds and explore the source code generated by the template in main.go:
package main

import (
	"fmt"
	"net/http"

	spinhttp "github.com/spinframework/spin/sdk/go/v2/http"
)

func init() {
	spinhttp.Handle(func(w http.ResponseWriter, r *http.Request) {
		w.Header().Set("Content-Type", "text/plain")
		fmt.Fprintln(w, "Hello Fermyon!")
	})
}

func main() {}
Compile the Application
Use the spin build command to compile your Spin app to WebAssembly:
$ spin build
Building component hello-spin with `npm run build`

> hello-spin@1.0.0 build
> npx webpack --mode=production && npx mkdirp target && npx j2w -i dist.js -d combined-wit -n combined -o target/hello-spin.wasm

asset dist.js 5.93 KiB [compared for emit] [javascript module] (name: main)
orphan modules 25.5 KiB [orphan] 25 modules
./src/spin.js + 2 modules 5.95 KiB [built] [code generated]
webpack 5.97.1 compiled successfully in 66 ms
Using user provided wit in: combined-wit
Successfully written component
Finished building all Spin components
$ spin build
Building component hello-spin with `npm run build`

> hello-spin@1.0.0 build
> npx webpack --mode=production && npx mkdirp target && npx j2w -i dist.js -d combined-wit -n combined -o target/hello-spin.wasm

asset dist.js 6 KiB [emitted] [javascript module] (name: main)
orphan modules 25.4 KiB [orphan] 25 modules
./src/spin.ts + 2 modules 5.97 KiB [built] [code generated]
webpack 5.97.1 compiled successfully in 509 ms
Using user provided wit in: combined-wit
Successfully written component
Finished building all Spin components
$ spin build
Building component hello-spin with `cargo build --target wasm32-wasip1 --release`
    Updating crates.io index
     Locking 95 packages to latest compatible versions
     ...
     Compiling hello-spin v0.1.0 (/Users/john/hello-spin)
    Finished `release` profile [optimized] target(s) in 9.89s
Finished building all Spin components
$ spin build
Executing the build command for component hello-spin: tinygo build -target=wasi -gc=leaking -no-debug -o main.wasm main.go
go: downloading github.com/spinframework/spin/sdk/go v0.10.0
Finished building all Spin components
If the build fails, check:
- Are you in the
hello-spindirectory? - Did you successfully install TinyGo?
- Are your versions of Go and TinyGo up to date? The Spin SDK needs TinyGo 0.27 or above.
- Set Environment Variable
CGO_ENABLED=1. (Since the Go SDK is built using CGO, it requires the CGO_ENABLED=1 environment variable to be set.)
If you would like to know what build command Spin runs for a component, you can find it in the manifest, in the component.(id).build section:
[component.hello-spin.build]
command = "tinygo build -target=wasi -gc=leaking -no-debug -o main.wasm main.go"
You can always run this command manually; spin build is a shortcut to save you having to remember it.
Test the Application Locally
You can always test your Spin apps on your local computer by using the spin up command. The spin up command will start an HTTP server on your local machine (port 3000 by default) and instantiate and invoke your Spin application for every request sent to the endpoint:
$ spin up
Logging component stdio to ".spin/logs/"

Serving http://0.0.0.0:3000
Available Routes:
  hello-spin: http://0.0.0.0:3000 (wildcard)
Note: If port
3000is already in use, you could set a different port by specifying the--listenflag (spin up --listen 127.0.0.1:3001).
From within an additional terminal instance, you can use a tool like curl to send an HTTP request to your Spin app:
$ curl -iX GET http://localhost:3000/
HTTP/1.1 200 OK
content-length: 14
content-type: text/plain;charset=UTF-8
date: Tue, 14 Jan 2025 16:10:36 GMT

Hello, Fermyon
You can terminate spin up at anytime, by pressing CTRL+C.
Log in to the Fermyon Wasm Functions
Once you’ve installed the aka plugin for Spin, you must log in to Fermyon Wasm Functions, which requires your GitHub account to sign in:
$ spin aka login
Go to https://login.infra.fermyon.tech/realms/neutrino/device?user_code=BB-AA
and follow the prompts.

Don't worry, we'll wait here for you. You got this.
Click the link displayed as part of the output from the spin aka login command. Authenticate using your individual GitHub Account and authorize the spin CLI for interacting with your Fermyon Wasm Functions account.
Deploy the Application
Finally, let’s deploy the application to Fermyon Wasm Functions:
$ spin aka deploy
The spin command will run using the Spin binary in your system path and read the Spin application definition file spin.toml in the current (hello-spin) directory to know what application to deploy. It will ask you for a name for the application (defaulting to hello-spin) and then it will ask for confirmation that you want to deploy.
Learn more
Deploying a Spin application to Fermyon Wasm Functions includes packaging the application and all the required files, uploading it to an OCI registry, as well as instantiating the application on Fermyon Wasm Functions.
Success
This is what a successful Spin application deployment on Fermyon Wasm Functions looks like:
Name of new app: hello-spin
Creating new app hello-spin in account your-account
Note: If you would instead like to deploy to an existing app, cancel this deploy and link this workspace to the app with `spin aka app link`
OK to continue? yes
Workspace linked to app hello-spin
Waiting for app to be ready... ready

App Routes:
- hello-spin: https://ec8a19d8-6d10-4056-bb69-cc864306b489.aka.fermyon.tech (wildcard)
You can CTRL+Click on the link in the terminal to visit the web application you just deployed.
Congratulations, you’ve now deployed your first Spin application to Fermyon Wasm Functions!
Next Steps
- Learn how to list and inspect your Spin applications deployed to Fermyon Wasm Functions
- Go and check out the Key Value Store and PostgreSQL tutorials
- Learn how to delete your Spin application