
Stream Data from Linode Object Store
- Prerequisites
- Introduction
- Step 1: Set Up the Spin Application
- Step 2: Install AWS S3 Client SDK
- Step 3: Configure Spin Application Variables
- Step 4: Implement the Spin Application
- Step 5: Compiling and Running the Spin Application
- Step 6: Test the Endpoints
- Step 7: Deploying to Fermyon Wasm Functions
- Conclusion
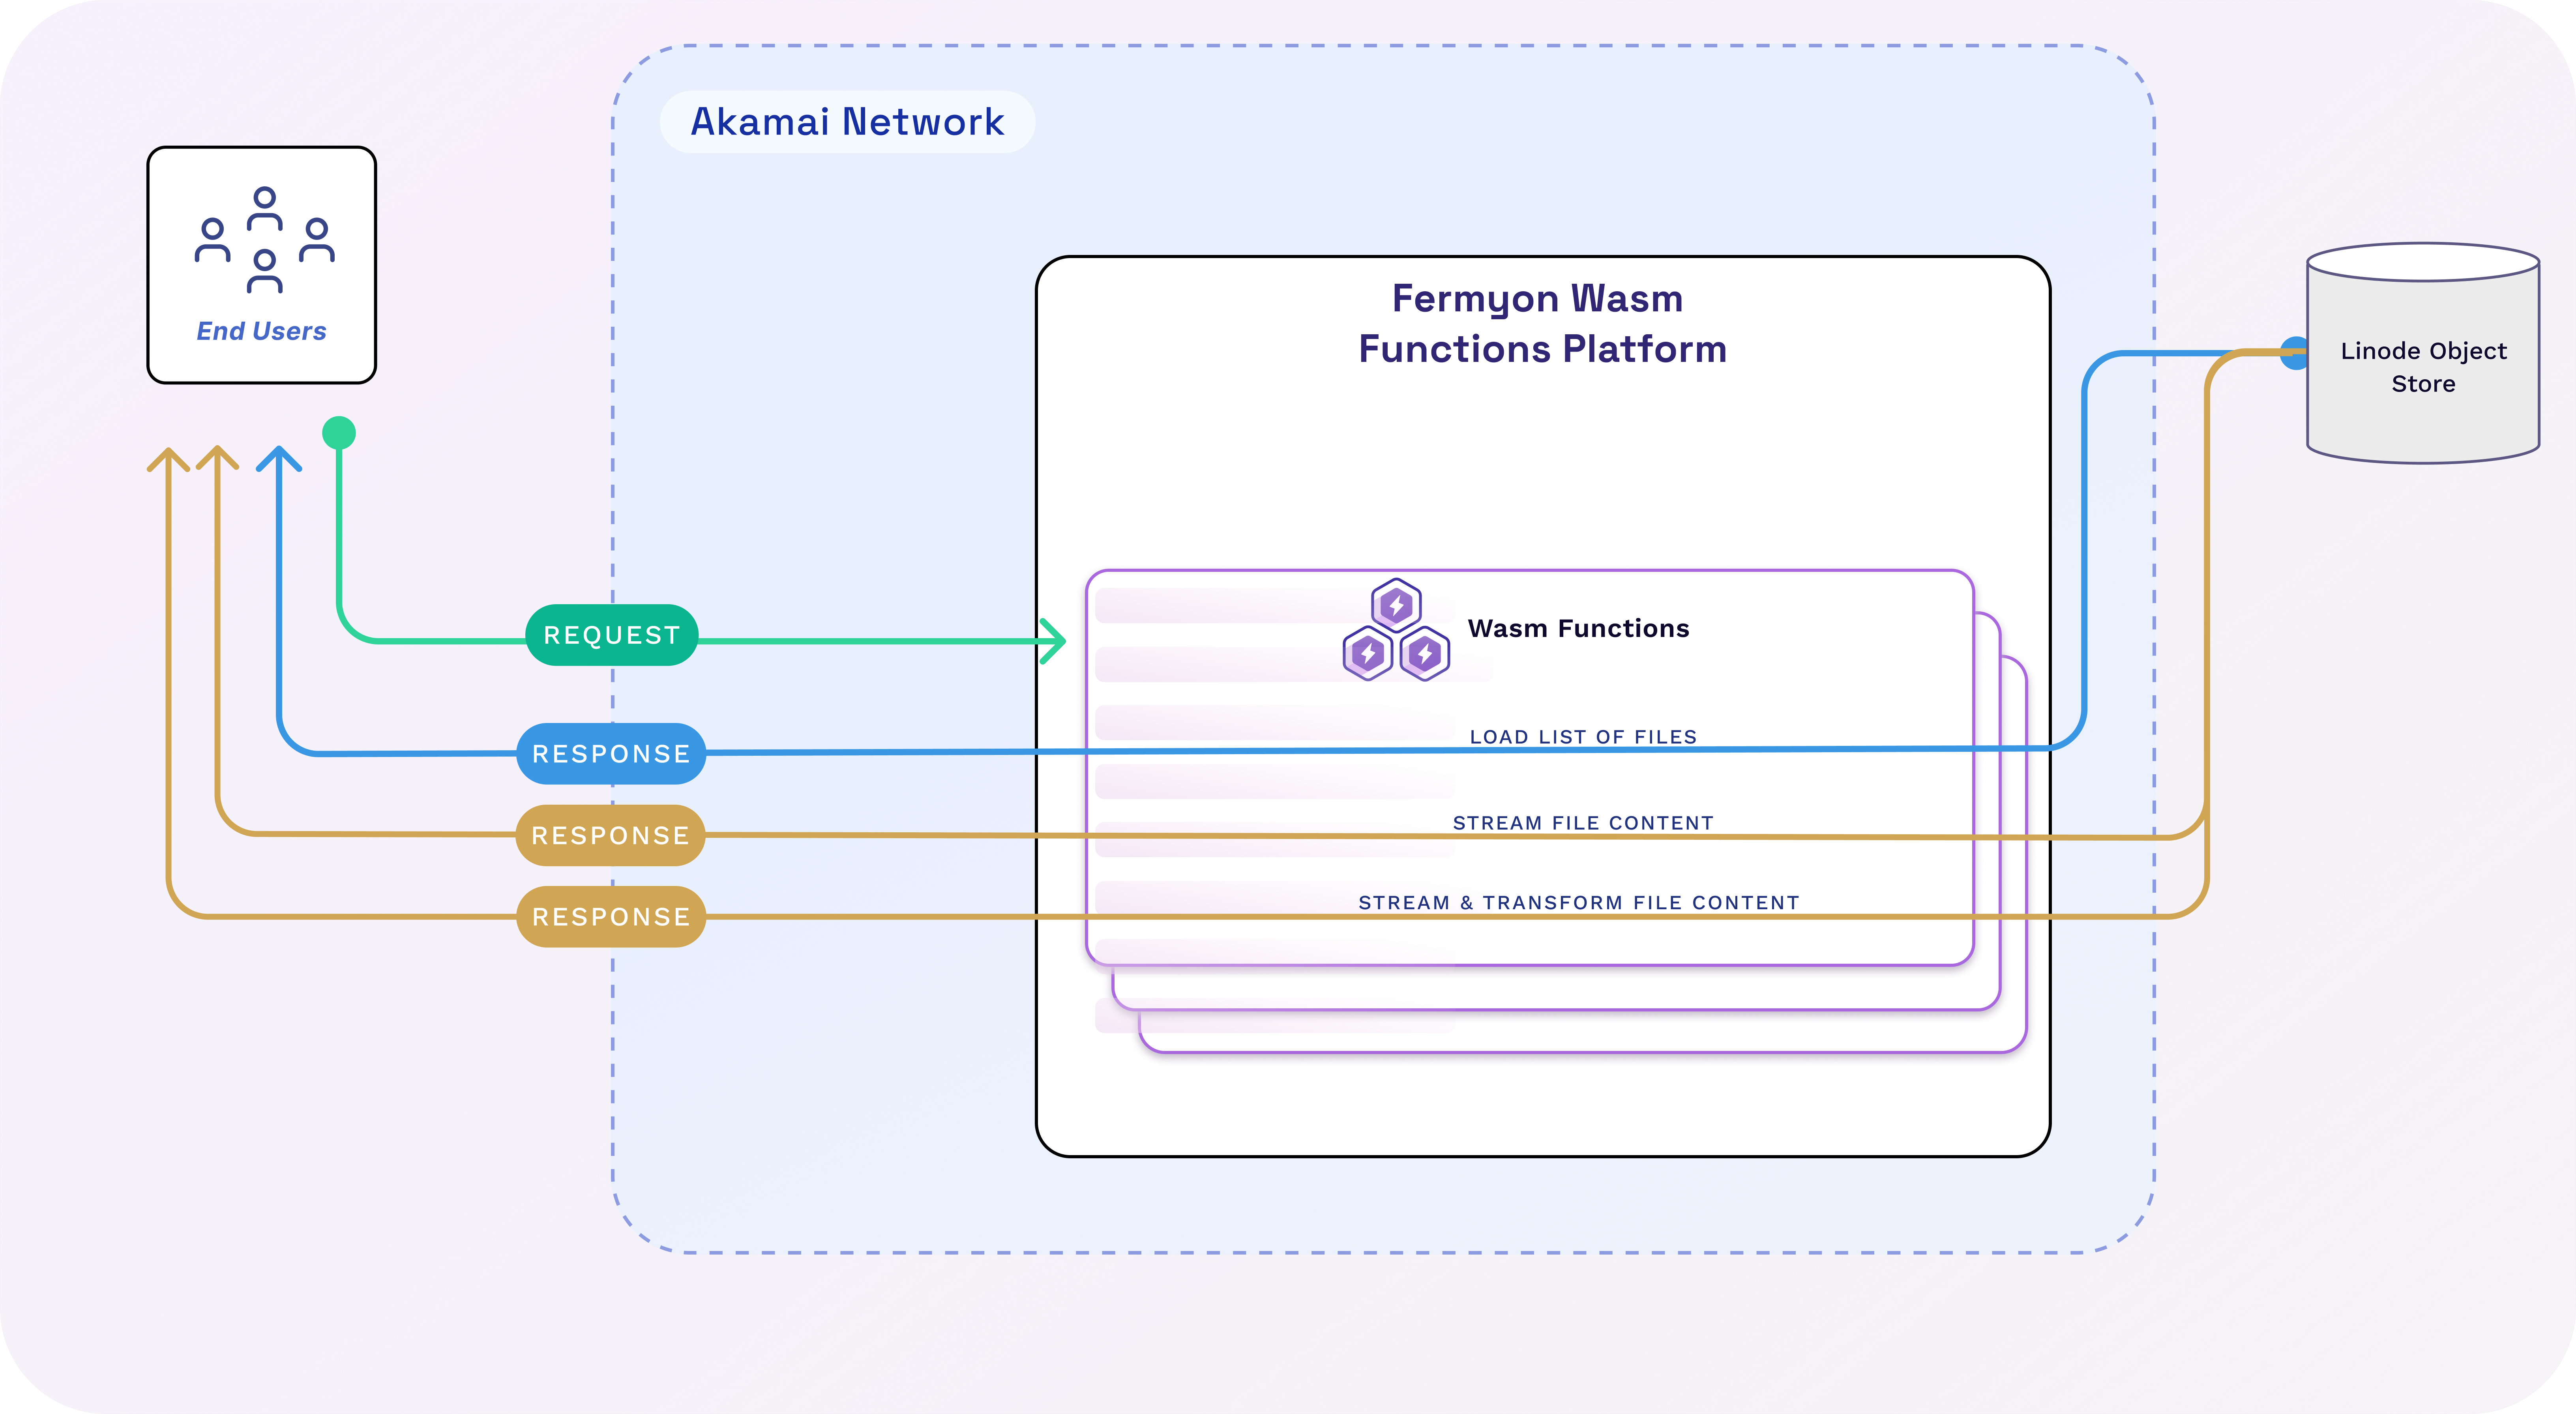
This tutorial walks you through building a Spin application in TypeScript that streams data from Linode Object Store. You will learn how to configure Spin variables for object storage, set up routes to list and stream files, and apply real-time transformations using the @aws-sdk/client-s3 package. Once we’ve built and tested the app locally, we’ll deploy it to Fermyon Wasm Functions.
Prerequisites
To follow along the instructions illustrated as part of this tutorial, ensure you have the following installed on your machine:
- The latest version of the
spinCLI and itsakaplugin- Please use the official Fermyon Wasm Functions Quickstart to install Spin and also log in to Fermyon Wasm Functions.
- Node.js (version
22or later)
We’ll use an existing Linode Object Store for the sake of this tutorial. If you want to use your own instance, permissions for deploying a new Object Store to Linode are required.
Introduction
Linode Object Store is an S3-compatible cloud storage service designed for storing and serving large amounts of unstructured data. We will use the @aws-sdk/client-s3 NPM package to interact with Linode’s Object Store in our Spin application.
Our Spin application will expose three routes:
GET /files- Lists all files in a Linode Object Storage bucket.GET /file/:name- Streams the contents of a specified file.GET /transformed-file/:name- Streams the file’s contents while transforming text to uppercase.
Step 1: Set Up the Spin Application
Run the following commands to initialize a new Spin application using the http-ts template:
$ spin new -t http-ts -a linode-streaming-app

$ cd linode-streaming-app
Step 2: Install AWS S3 Client SDK
Install the @aws-sdk/client-s3 dependency using npm:
$ npm install @spinframework/spin-variables @aws-sdk/client-s3
Step 3: Configure Spin Application Variables
First, let’s edit the application manifest (spin.toml) and introduce application variables to ensure that the application configuration could be changed without having to modify the actual application code.
[variables]
region = { required = true }
endpoint = { required = true }
bucket_name = { required = true }
access_key_id = { required = true }
secret_access_key = { required = true, secret = true}
Having the application variables defined, we must update the component configuration and grant the component access to the desired variables. To do so, add a new table to spin.toml:
[component.linode-streaming-app.variables]
region = ""
endpoint = "https://"
bucket_name = ""
access_key_id = ""
secret_access_key = ""
Additionally, we must allow the linode-streaming-app component doing outbound network requests towards our S3 bucket. Update the component configuration and set the allowed_outbound_hosts property as shown in the following snippet:
[component.linode-streaming-app]
# ...
allowed_outbound_hosts = ['https://.']
With the updated application manifest in place, we can move on and start implementing the Spin application.
Step 4: Implement the Spin Application
Go ahead and replace the contents of src/index.ts using the TypeScript code shown in the snippets of this section.
import { AutoRouter, json } from 'itty-router';
import { S3Client, GetObjectCommand, ListObjectsV2Command } from '@aws-sdk/client-s3';
import * as Variables from '@spinframework/spin-variables';

const dec = new TextDecoder();
const enc = new TextEncoder();

let router = AutoRouter();

// a custom config interface holding all configuration data
interface Config {
    region: string,
    endpoint: string,
    accessKeyId: string,
    secretAccessKey: string,
    bucketName: string
}

router
    .get("/files", async (_, {config}) => await listFiles(config))
    .get('/files/:name', async ({ name }, {config}) => await streamFile(name, config))
    .get("/transformed-files/:name", async ({ name }, {config}) => await streamAndTransformFile(name, config));

//@ts-ignore
addEventListener('fetch', async (event: FetchEvent) => {

	// load application variables
    const endpoint = Variables.get("endpoint");
    const accessKeyId = Variables.get("access_key_id");
    const secretAccessKey = Variables.get("secret_access_key");
    const bucketName = Variables.get("bucket_name");
    const region = Variables.get("region");

    // if any variable is not specified or empty, terminate and send a HTTP 500
    if (!endpoint || !accessKeyId || !secretAccessKey || !bucketName || !region) {
        return new Response("Application not configured correctly", { status: 500 });
    }

    // Pass the Configuration to the Router
    event.respondWith(router.fetch(event.request, {
        config: {
            endpoint,
            accessKeyId,
            secretAccessKey,
            bucketName,
            region
        } as Config
    }));
});
The listFiles function is responsible for loading a list of all files stored in the S3 bucket and returning them as JSON array:
const listFiles = async (config: Config): Promise<Response> => {
    // construct a new S3 client using configuration data
    const s3 = new S3Client({
        region: config.region,
        endpoint: config.endpoint,
        credentials: {
            accessKeyId: config.accessKeyId,
            secretAccessKey: config.secretAccessKey,
        }
    });
    try {
		const input = { Bucket: config.bucketName };
		// load metadata of all files in our S3 bucket
        const { Contents } = await s3.send(new ListObjectsV2Command(input));
		// grab all files names, fallback to an empty array
        const files = Contents?.map((file) => file.Key) || [];
		// return list of files as JSON
        return json({ files });
    } catch (error) {
        console.log(error);
        return new Response(JSON.stringify(error), { status: 500 })
    }
}
Next, let’s add the streamFile function, which is responsible for stream a particular file from the S3 bucket as it is:
const streamFile = async (name: string, config: Config): Promise<Response> => {
    const s3 = new S3Client({
        region: config.region,
        endpoint: config.endpoint,
        credentials: {
            accessKeyId: config.accessKeyId,
            secretAccessKey: config.secretAccessKey,
        }
    });

    try {
		// construct command input for receiving the desired file
        const input = { Bucket: config.bucketName, Key: name };
		// request the desired file
        const { Body } = await s3.send(new GetObjectCommand(input));
		// pipe the file contents to the response
        return new Response(Body as ReadableStream, {
            status: 200,
        });

    } catch (error: any) {
        return new Response(`error : ${error.message}`, { status: 500 });
    }
}
Finally, let’s add the streamAndTransformFile function, which is the last handler of our application. In contrast to the previous handler function, this will define and apply a TransformStream to convert the entire contents of a particular file to be uppercased:
const streamAndTransformFile = async (name: string, config: Config): Promise<Response> => {
	// define the transform operation
    const upperCaseTransform = new TransformStream({
        transform(chunk, controller) {
			// decode the byte array using TextDecoder
            const txt = dec.decode(chunk, { stream: true });
			// apply transformation and encode the transformed chunk again
            controller.enqueue(enc.encode(txt.toUpperCase()));
        }
    });

    const s3 = new S3Client({
        region: config.region,
        endpoint: config.endpoint,
        credentials: {
            accessKeyId: config.accessKeyId,
            secretAccessKey: config.secretAccessKey,
        }
    });

    try {
        const input = { Bucket: config.bucketName, Key: name };
        const { Body } = await s3.send(new GetObjectCommand(input));
		// pipe the file contents through the custom transformation
        const transformed = (Body as ReadableStream).pipeThrough(upperCaseTransform);
		// pipe the transformed stream to the response
        return new Response(transformed, {
            status: 200,
        });
    } catch (error: any) {
        return new Response(`error : ${error.message}`, { status: 500 });
    }
}
Step 5: Compiling and Running the Spin Application
With implementation finished, we can use spin build to compile our source code down to WebAssembly and spin up to run it on our local machine.
As we’ve marked all our variables as required, we must specify them before running the application. Although there are different ways for achieving this, we’ll simply export all necessary variables before invoking spin up:
NOTE: As mentioned at the beginning of this tutorial, we’ll use a preexisting S3 bucket. (The access key generated for this tutorial has ReadOnly permissions). If you want to use your own instance of Linode Object Store, provide your individual values when setting the application variables in the upcoming snippet.
$ spin build

$ export SPIN_VARIABLE_REGION=se
$ export SPIN_VARIABLE_ENDPOINT=se-sto-1.linodeobjects.com
$ export SPIN_VARIABLE_ACCESS_KEY_ID=LOJ4PC86TOZX5ABQKA4E
$ export SPIN_VARIABLE_SECRET_ACCESS_KEY=KhdjljQCAarOoNEpVA9PfcbL9u4qUN4cgtoMVnMQ
$ export SPIN_VARIABLE_BUCKET_NAME=fwf-tech-docs-tutorials

$ spin up
Executing spin up should generate a output similar to the following, indicating that our application is now served on http://localhost:3000:
Logging component stdio to ".spin/logs/"

Serving http://127.0.0.1:3000
Available Routes:
  linode-streaming-app: http://127.0.0.1:3000 (wildcard)
Step 6: Test the Endpoints
Let’s use curl to test the different endpoints exposed by our Spin application:
List Files:
$ curl http://127.0.0.1:3000/files
{"files":["large.txt","small.txt","tiny.txt"]}
Get a Specific File:
$ curl http://127.0.0.1:3000/file/tiny.txt
lorem ipsum dolor sit amet, consetetur sadipscing elitr, sed diam nonumy eirmod tempor invidunt ut labore et dolore magna aliquyam erat, sed diam voluptua.
Get a Transformed File (Uppercase text):
$ curl http://127.0.0.1:3000/transformed-file/tiny.txt
LOREM IPSUM DOLOR SIT AMET, CONSETETUR SADIPSCING ELITR, SED DIAM NONUMY EIRMOD TEMPOR INVIDUNT UT LABORE ET DOLORE MAGNA ALIQUYAM ERAT, SED DIAM VOLUPTUA.
Step 7: Deploying to Fermyon Wasm Functions
Having the application successfully tested on our local machine, we’ll use the spin aka command to deploy the application to Fermyon Wasm Functions.
NOTE: As mentioned at the beginning of this tutorial, we’ll use a preexisting S3 bucket. (The access key generated for this tutorial has ReadOnly permissions). If you want to use your own instance of Linode Object Store, provide your individual values when setting the application variables in the upcoming snippet.
$ spin aka deploy --variable region=se \
  --variable endpoint=se-sto-1.linodeobjects.com \
  --variable access_key_id=LOJ4PC86TOZX5ABQKA4E \
  --variable secret_access_key=KhdjljQCAarOoNEpVA9PfcbL9u4qUN4cgtoMVnMQ \
  --variable bucket_name=fwf-tech-docs-tutorials
Deployment to Fermyon Wasm Functions will take a couple of seconds, once the deployment is finished, you should be presented with an output similar to this:
Name of new app: linode-streaming-app
Creating new app linode-streaming-app in account your-account
Note: If you would instead like to deploy to an existing app, cancel this deploy and link this workspace to the app with `spin aka app link`
OK to continue? yes
Workspace linked to app linode-streaming-app
Waiting for app to be ready... ready

App Routes:
- linode-streaming-app: https://ec8a19d8-6d10-4056-bb69-cc864306b489.aka.fermyon.tech (wildcard)
Conclusion
You have successfully built a Spin application that integrates with Linode Object Store using TypeScript. This app lists files, streams file content, and applies transformations using streaming. You can extend this further by adding authentication or additional transformations.