
Building a Supabase Cache Proxy
- Prerequisites
- What Is Supabase
- Provisioning the Database on Supabase
- Implementing the Spin Application
- Deploying to Fermyon Wasm Functions
- Bonus: Cache Invalidation upon External Data Modifications
- Summary
In this tutorial we will build a Spin application that will cache data from Supabase using Key Value store and deploy it to Fermyon Wasm Functions.
Prerequisites
You need to have spin CLI installed on your computer. Please use the official Fermyon Wasm Functions Quickstart to install install Spin and also log in to Fermyon Wasm Functions.
What Is Supabase
Supabase is an open-source Backend-as-a-Service (BaaS) that provides a PostgreSQL database with real-time capabilities, row-level security, and automatic API generation based on your schema. It supports relational data with foreign keys, full-text search, and extensions like PostGIS for geospatial queries. There is a Supabase free tier available, which we will use as part of the tutorial.
Provisioning the Database on Supabase
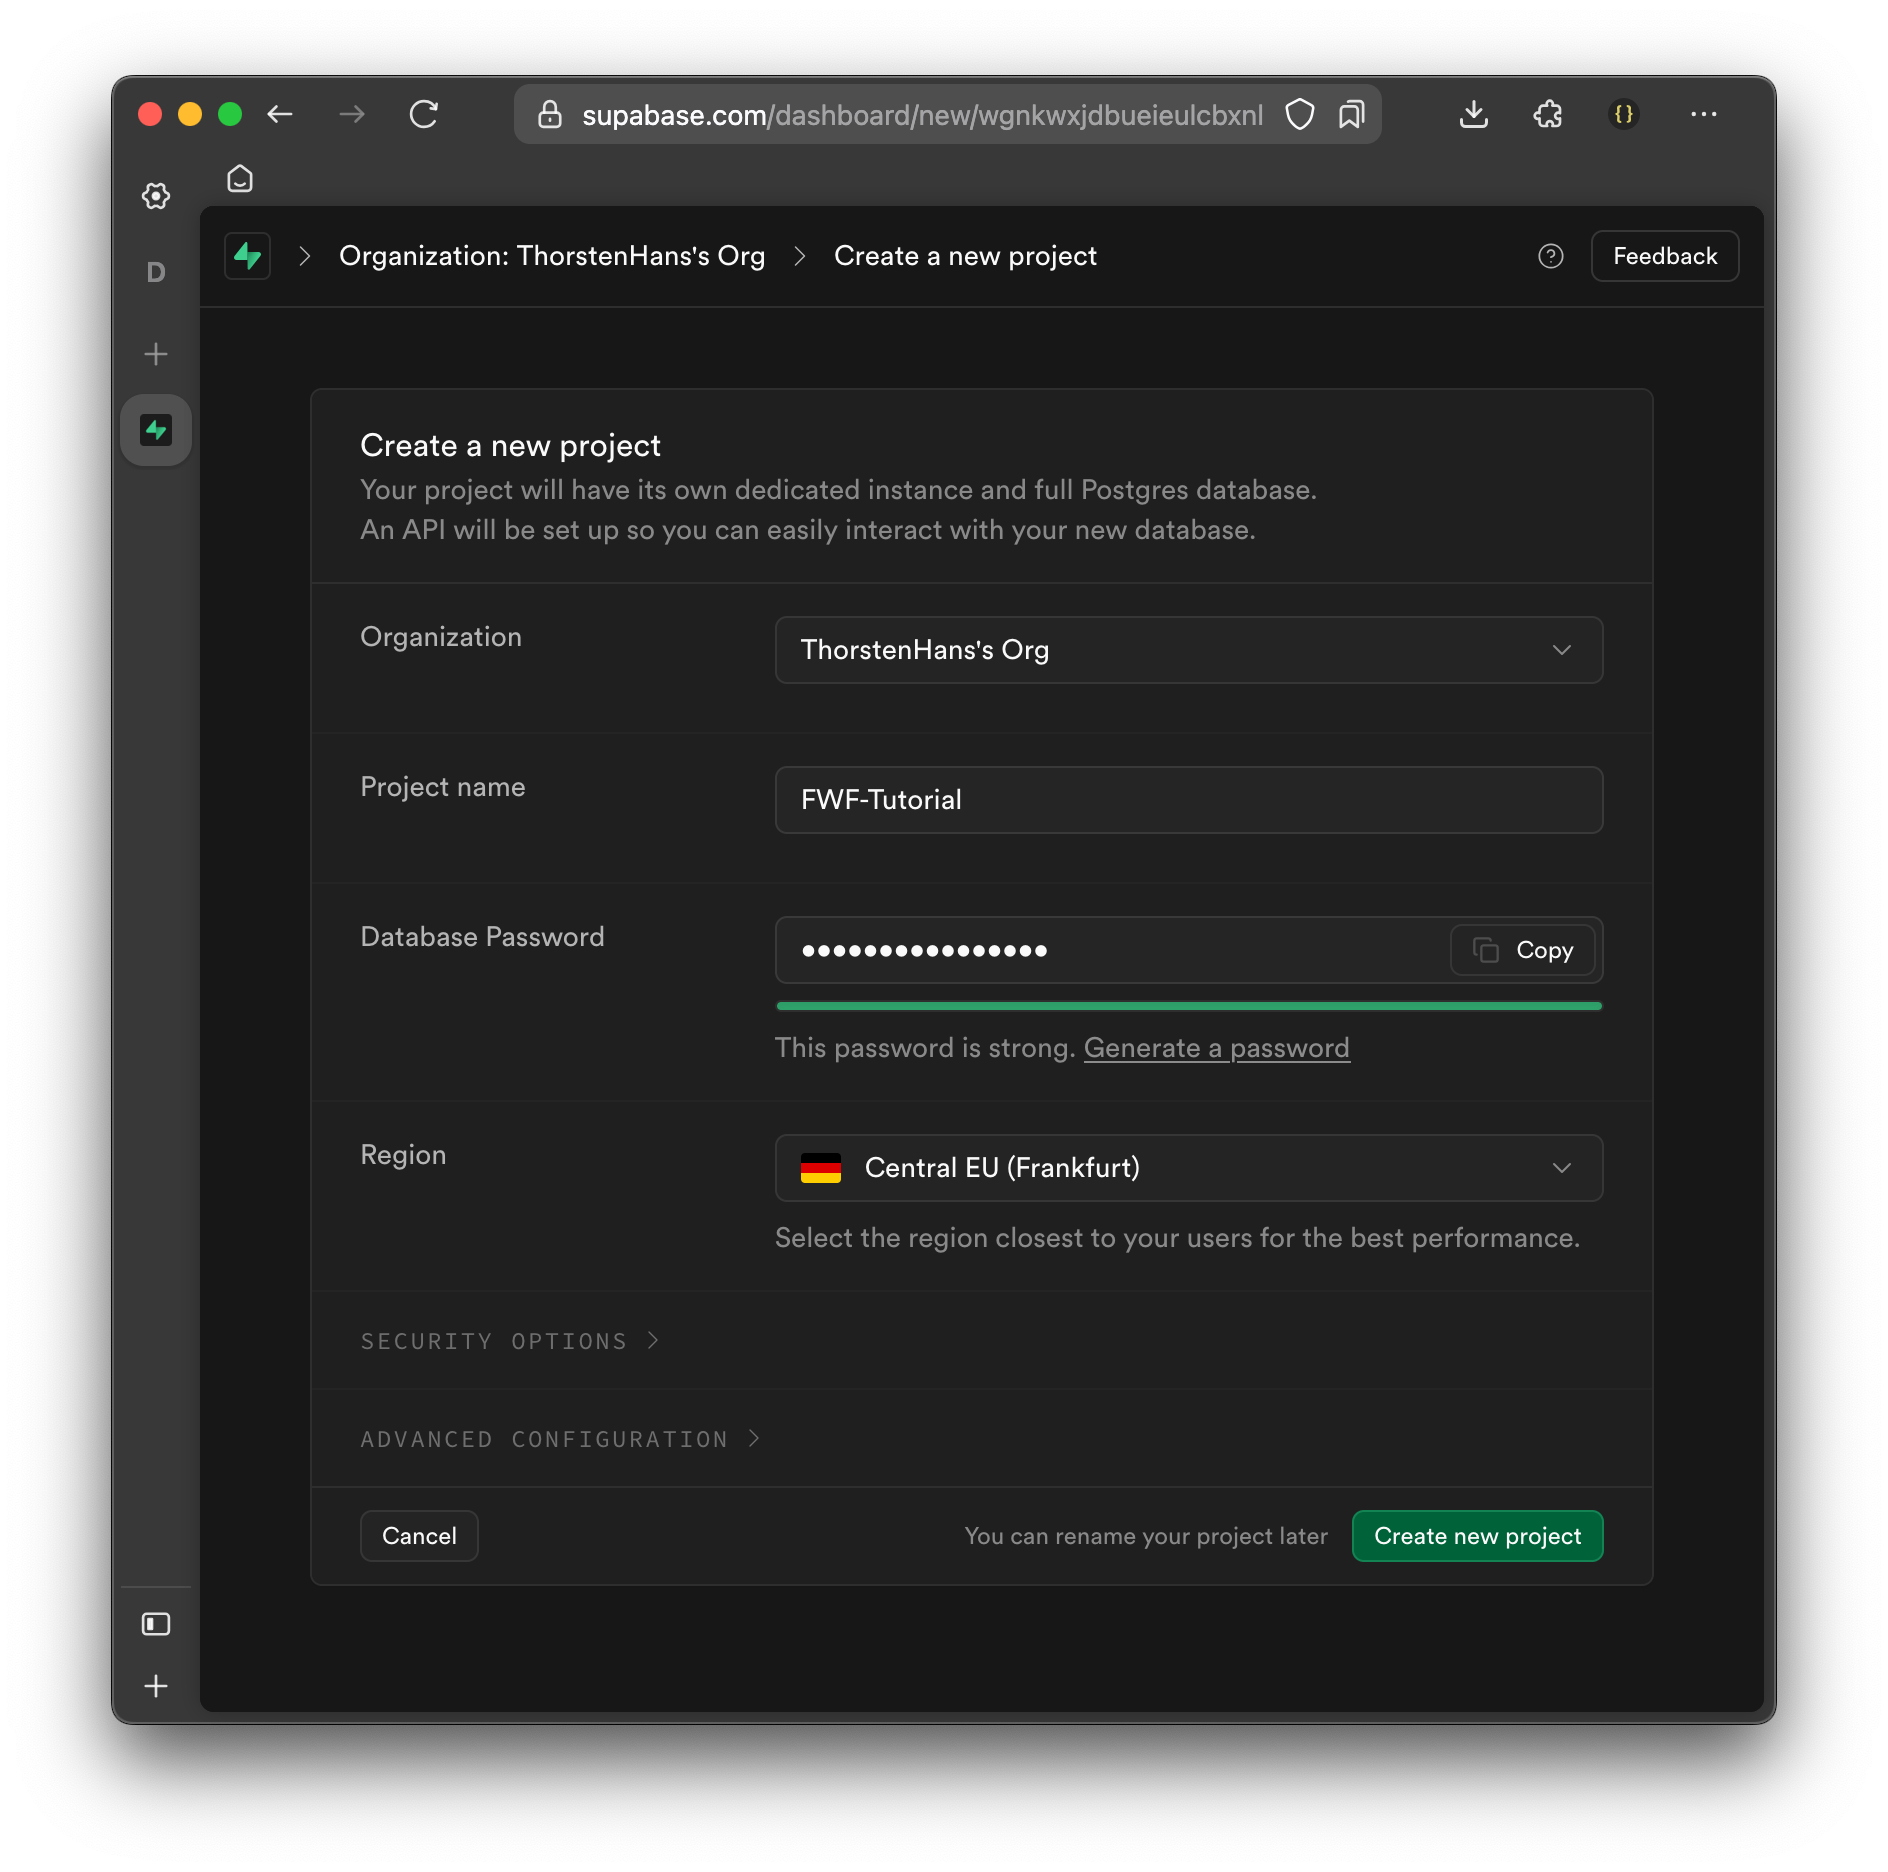
To sign up for the free tier of Supabase using your GitHub account, go to https://supabase.com and click the Start Your Project button. On the login page, select Continue with GitHub, which will redirect you to GitHub’s authorization page. If you’re not already logged in, enter your GitHub credentials. Grant Supabase the necessary permissions to access your GitHub account. Once authorized, you’ll be redirected to the Supabase dashboard, where you can provide details about your organization and create a new project under the free tier.
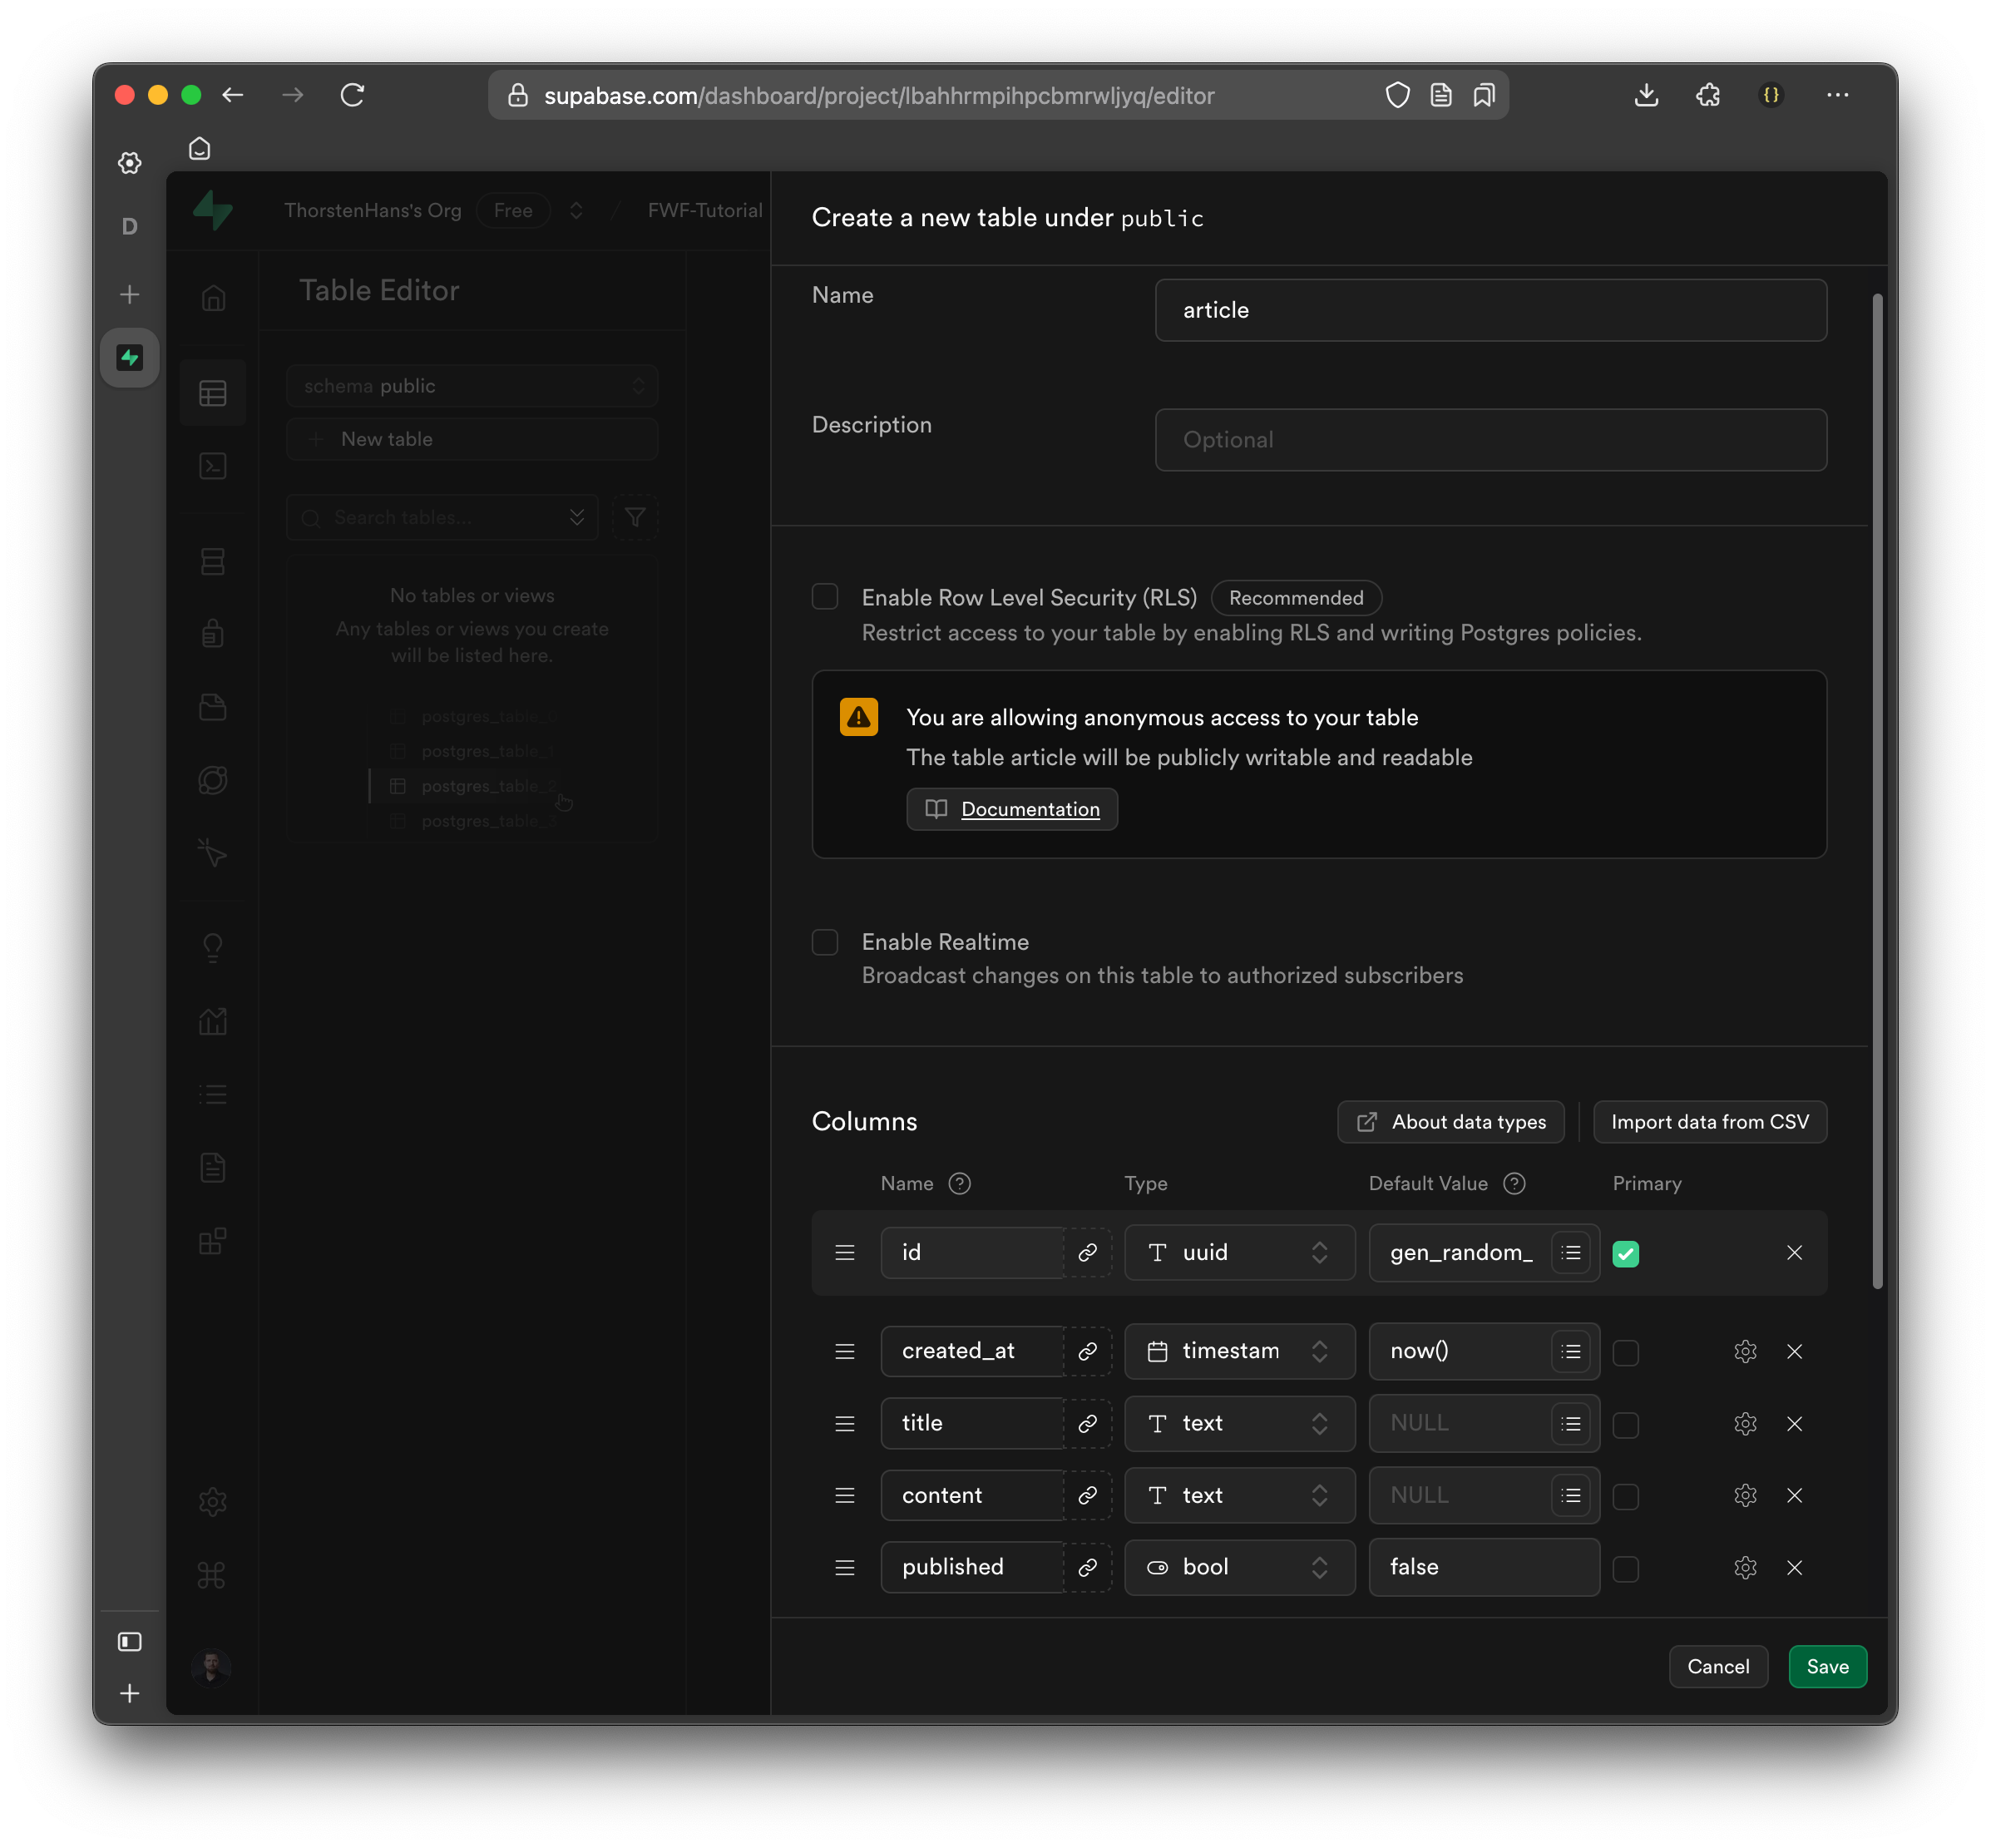
Once your project has been created use the Table Editor and create the articles table by specifying the following columns
| Column Name | DataType | Default Value | Nullable | Description |
|---|---|---|---|---|
| id | uuid | gen_random_uuid() | No | Primary key (auto generated by database) |
| created_at | timestamp | now() | No | Creation timestamp of the article |
| title | text | NULL | No | Title of the article |
| content | text | NULL | No | Content of the article |
| published | bool | false | No | Boolean flag indicating if article is a draft |
When creating the table, make sure to disable Row Level Security (RLS). Although RLS is an amazing feature of Supabase, we won’t use it as part of this tutorial, to keep things as simple.
With the articles table created, use the SQL Editor for seeding some sample data to the articles table. Copy the SQL snippet from below and hit the Run button, which will add four new sample articles to the database:
insert into articles(title, content)
values
	('Hello World', 'Welcome to our shiny new blog! ...'),
	('Introducing Fermyon Wasm Functions', 'We are thrilled to announce Fermyon Wasm Functions, ...'),
	('What is Spin', 'This post explains what Spin is and how it increases your productivity ...'),
    ('What is WebAssembly', 'Secure, Portable and Fast! WebAssembly is here to revolutionize ...');
Finding Supabase Project URL and API Key
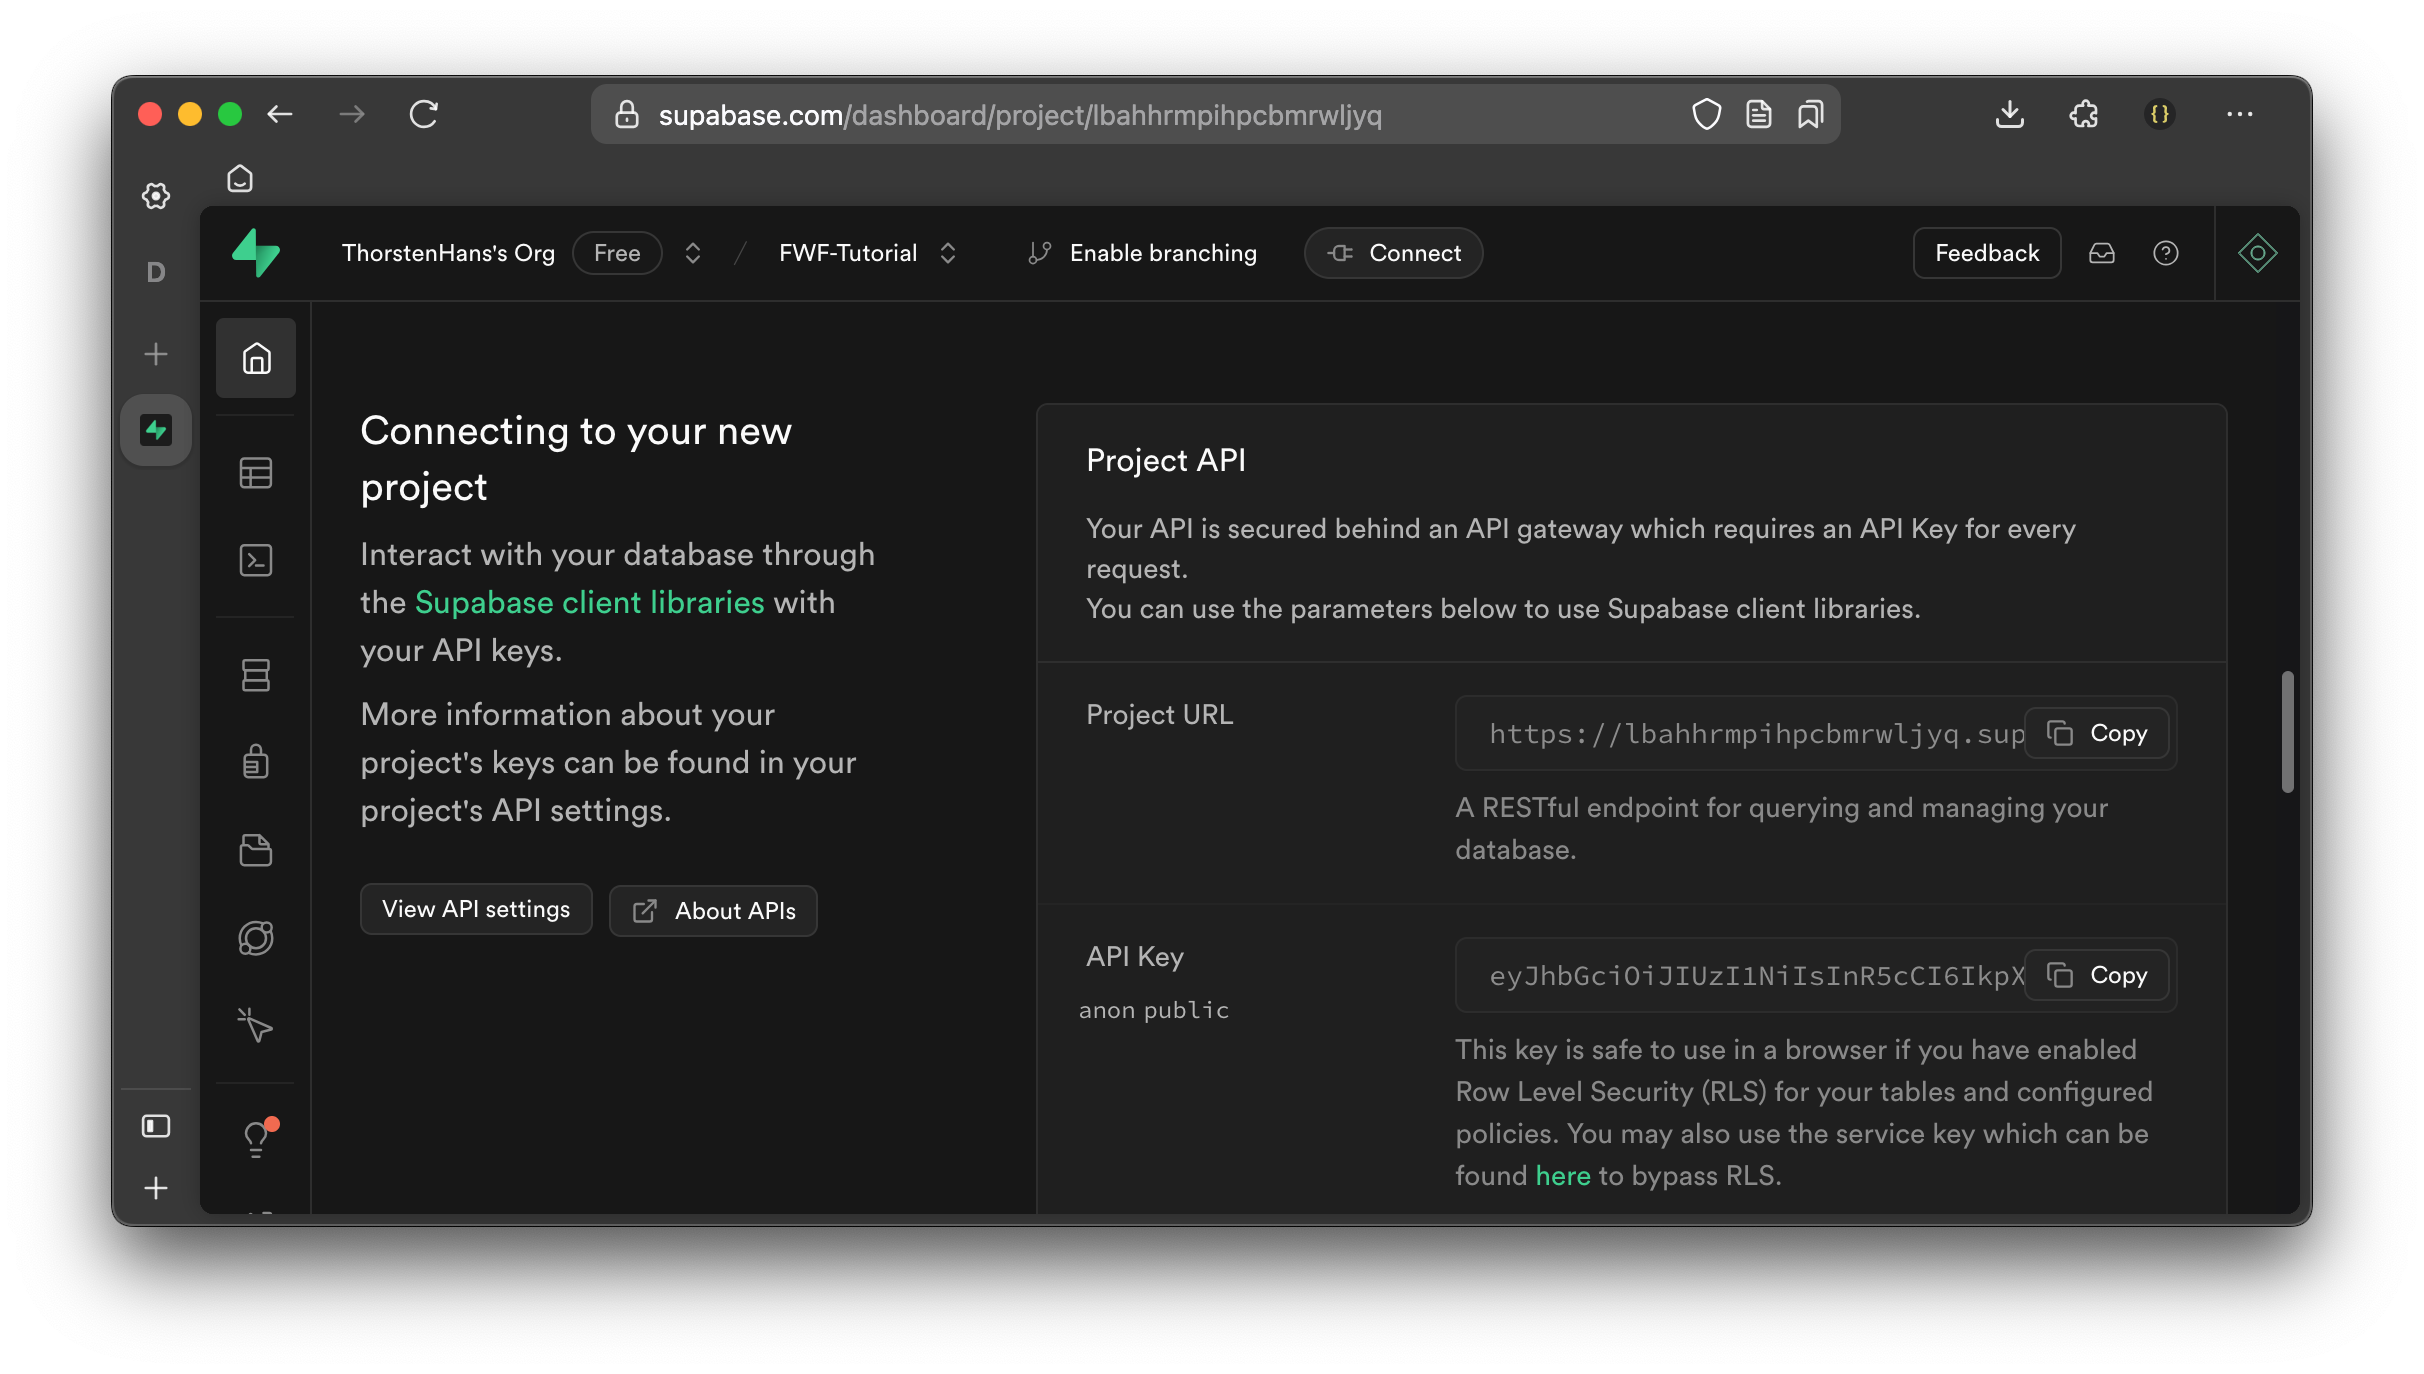
Navigate to the Home of your Supabase project and find the Connecting to your new project section. From here, copy the Project URL and API Key and keep them in a readily accessible location. We will need both values for authenticating calls from our Spin application towards Supabase in the following section.
Implementing the Spin Application
With the spin CLI, we can take advantage of its default templates by using the spin new command to create a new Spin application using the http-ts template. Once the application skeleton has been created, we install the @supabase/supabase-js Node.js module as a dependency:
$ spin new -t http-ts -a supabase-proxy
$ cd supabase-proxy
$ npm install @spinframework/spin-variables @spinframework/spin-kv @supabase/supabase-js --save
Next, we will update the application manifest (spin.toml) by adding three new variables to grant our application access to the following information:
| Name | Configuration | Description |
|---|---|---|
supabase_url | { required = true } | The Endpoint of your Supabase project |
supabase_key | { required = true, sensitive = true } | The Key for authenticating against Supabase |
cache_ttl | { default = "5" } | Cache Time-To-Live (TTL) in Minutes |
Update the spin.toml, and introduce a new variables section to the application manifest using the variables defined above:
[variables]
supabase_url = { required = true }
supabase_key = { required = true, sensitive = true }
cache_ttl = { default = "5" }
With the application variables defined, we must link them to our application component. Additionally, we must allow the component to send outbound requests to supabase_url. Remember that Spin follows a capabilities-based security model, meaning we must explicitly grant the application access to variables and outbound requests. Both actions are achieved using the interpolation syntax:
# Excerpt from the application configuration file (TOML)
# This section defines a component named "supabase-proxy" and links it to application variables.

[component.supabase-proxy]
# Explicitly allow outbound requests to the Supabase URL
allowed_outbound_hosts = [""]

# Link environment variables to the component
[component.supabase-proxy.variables]
supabase_url = ""
supabase_key = ""
cache_ttl = ""
Having everything configured correctly, we will move on and implement the CRUD (Create, Read, Updated, Delete) endpoints of our application.
Implementing HTTP APIs
In this section, we will implement the core HTTP handlers for our application, each responsible for interacting with Supabase. We’ll start by defining middleware to load configuration variables, then set up our HTTP routes, and finally implement handlers for creating, reading, updating, and deleting articles.
Let’s start by creating a middlewares.ts file in the src folder of your application and add the following code:
import * as Variables from "@spinframework/spin-variables"
import { IRequest } from "itty-router";

/**
 * Application Configuration
 */
export interface Config {
  url: string,
  key: string,
  cacheTtl: number,
}

/**
  * Middleware to load application configuration
  * An instance of {@link Config} is set on the request
  *
  * @param request The {@link IRequest} automatically passed by itty-router
  * @throws An error if required configuration data is falsy
  */
export function withConfig(request: IRequest) {
  const url = Variables.get('supabase_url');
  const key = Variables.get('supabase_key');
  const ttl = +(Variables.get('cache_ttl') ?? "5");
  if (!url || !key) {
    throw new Error("Required Configuration data not set");
  }

  // set the config on the actual request
  request.config = {
    url,
    key,
    cacheTtl: ttl
  } as Config;
}
Having the withConfig middleware in place, it’s time to layout the HTTP endpoints of our application. Update the src/index.ts file and replace its content with the following code:
import { AutoRouter, json } from 'itty-router';
import { Config, withConfig } from './middlewares';

let router = AutoRouter();

router
  // run the withConfig middleware for every incoming request
  .all('*', withConfig)
  // Create new article
  .post('/articles', async (req) => createArticle(await req.arrayBuffer(), req.config as Config))
  // Read all articles
  .get('/articles', ({ config }) => readArticles(config))
  // Read article by id
  .get('/articles/:id', ({ id, config }) => readArticleById(id, config))
  // Update article by id
  .put('/articles/:id', async (req) => updateArticleById(req.params.id, await req.arrayBuffer(), req.config as Config))
  // Delete article by id
  .delete('/articles/:id', ({ id, config }) => deleteArticleById(id, config));

//@ts-ignore
addEventListener('fetch', async (event: FetchEvent) => {
  event.respondWith(router.fetch(event.request));
});
Let’s implement all handlers that were specified as part of the routes in the previous snippet. Because each handler is going to interact with our Supabase instance, we will bring the createClient function from the @supabase/supabase-js Node.js module in scope by adding the following import statement at the top of the src/index.ts file:
import { createClient } from '@supabase/supabase-js';
With the createClient method in scope, we can implement the handler for reading all articles from Supabase:
const readArticles = async (config: Config): Promise<Response> => {
  // create a Supabase client
  const supabase = createClient(config.url, config.key);
  // load all articles from supabase and sort them by created_at in descending order
  const { data, error } = await supabase.from('articles')
    .select()
    .order('created_at', { ascending: false });
  // Return early with an HTTP 500, if something went wrong
  if (error) {
    console.log(`Error while reading single article: ${error.message} ${error.details} ${error.stack}`);
    return new Response(error.message, { status: 500 });
  }

  // Create an HTTP 200 result and sent all articles as JSON
  return json(data, { status: 200 });
}
Reading a single article is similar to reading all articles from Supabase. However, we may return an HTTP 404 (Not Found) if no article exists with the provided identifier in the route parameter (:id):
const readArticleById = async (id: string, config: Config): Promise<Response> => {
  // create a Supabase client
  const supabase = createClient(config.url, config.key);
  // load a single article using it's identifier
  // use the maybeSingle function, indicating that there might be no match at all
  const { data, error } = await supabase.from('articles')
    .select()
    .eq('id', id)
    .maybeSingle();

  // Return early with an HTTP 500, if something went wrong
  if (error) {
    console.log(`Error while reading single article: ${error.message} ${error.details} ${error.stack}`);
    return new Response(error.message, { status: 500 });
  }
  // Return early with an HTTP 404, if no article was found
  if (!data) {
    return new Response("Not Found", { status: 404 });
  }

  // Create an HTTP 200 result and sent the article as JSON
  return json(data, { status: 200 });
}
Users must sent a JSON object with title and content as payload for creating a new article. The implementation of createArticle validates the request payload and uses the Supabase API for inserting a new row into the articles table:
const createArticle = async (requestBody: ArrayBuffer, config: Config): Promise<Response> => {
  let payload;
  try {
    // create a new TextDecoder
    const decoder = new TextDecoder();
    // try to parse the request payload
    payload = JSON.parse(decoder.decode(requestBody));
  } catch (error) {
    // return early with an HTTP 400, in case malformatted data is provided
    return new Response("Bad Request", { status: 400 });
  }

  // if the provided payload does not specify title or content, return with an HTTP 400
  if (!payload.title || !payload.content) {
    return new Response("Bad Request", { status: 400 });
  }

  const supabase = createClient(config.url, config.key);

  // insert the article into the database
  const { data, error } = await supabase
    .from('articles')
    .insert({ title: payload.title, content: payload.content })
    .select()
    .single();
  // return early with HTTP 500, in case of any error
  if (error) {
    console.log(`Error while storing article in database: ${error.message} ${error.details} ${error.stack}`);
    return new Response('Internal Server Error', { status: 500 });
  }

  // return the new article with an HTTP 201
  return json(data, { status: 201 });
}
As part of the updateArticleById function, we must deal with callers providing an identifier (id) of a non-existing article. Luckily the fluent API of Supabase streamlines this as well:
const updateArticleById = async (id: string, requestBody: ArrayBuffer, config: Config): Promise<Response> => {
  let payload;
  try {
    const decoder = new TextDecoder();
    payload = JSON.parse(decoder.decode(requestBody));
  } catch (error) {
    return new Response("Bad Request", { status: 400 });
  }

  if (!payload.title || !payload.content) {
    return new Response("Bad Request", { status: 400 });
  }

  const supabase = createClient(config.url, config.key);
  const { data, error } = await supabase
    .from('articles')
    .update({ title: payload.title, content: payload.content, published: payload.published })
    .eq('id', id)
    .select()
    .maybeSingle();

  if (error) {
    console.log(`Error while updating article in database: ${error.message} ${error.details} ${error.stack}`);
    return new Response('Internal Server Error', { status: 500 });
  }
  if (!data) {
    return new Response('Not Found', { status: 404 });
  }
  return json(data, { status: 200 });
}
The deleteArticleById is the last handler we have to implement, again we receive the identifier of an article from the corresponding route parameter (:id) and leverage the Supabase API to delete the record from the articles table. We can check response.count to determine if a record was found with matching identifier or not:
const deleteArticleById = async (id: string, config: Config): Promise<Response> => {
  const supabase = createClient(config.url, config.key);
  const response = await supabase.from('articles').delete().eq('id', id);
  if (response.error) {
    console.log(`Error while deleting article from database: ${response.error.message} ${response.error.details} ${response.error.stack}`);
    return new Response('Internal Server Error', { status: 500 });
  }
  if (response.count == 0) {
    return new Response('Not Found', { status: 404 });
  }
  return new Response(null, { status: 204 });
}
At this point, we have a fully functional application. It interacts directly with the Supabase instance for reading and writing data. In the next section of the tutorial, we will add the caching capabilities to our application, for optimizing latency while delivering data for recurring requests.
Implementing a Cache Using Key Value Store
Applications deployed to Fermyon Wasm Functions could leverage a no-ops Key-Value store. The platform will provision and manage the Key Value store for you. All you’ve to do is specifying your intent of using a Key Value store. To do so, update the application manifest (spin.toml) and add a key_value_stores property to the component configuration as shown in the following snippet:
[component.supabase-proxy]
key_value_stores = ["default"]
For every Key Value store, you must specify a name. The name
defaultis special, because Spin SDKs provide convenient methods for accessing thedefaultKey Value store. If you chose a name other thandefault, you must use corresponding methods of the Spin SDK and provide the chosen name as argument.
Now that we have granted our component access to the default Key Value store, it’s time to implement caching capabilities. The cache implementation should address the following concerns:
- Persist individual articles in the cache, to allow retrieval using an article identifier (
id) - Persist a list of all articles in the cache using a consistent key (e.g.
all-articles) - All data persisted in the cache should have an expiration timestamp taking the
cache_ttlconfiguration data into context - Cache invalidation should happen whenever data is added, updated or removed from the cache
A note on cache performance expectations: Fermyon Wasm Functions’ Key Value store does not currently support geo-replication in public preview. This means that cache performance may vary depending on where requests originate. While this works well for many use cases, some latency-sensitive applications may experience differences in response times. We welcome feedback on how this impacts your experience so we can improve the service in future releases.
We’ll use the Kv APIs provided by the Spin SDK tor interacting with the Key Value store. Place the following code in the new src/cache.ts file:
import * as Kv from "@spinframework/spin-kv";

// CacheData is a wrapper for data stored in the key value store
// it defines when data will expire
interface CacheData {
  expiresAt: string,
  data: any
}

// Key for caching the list of all articles
export const ALL_ARTICLES_CACHE_KEY = "all-articles";

// function to compute the cache key for a particular article using its identifier
export function buildKey(id: string): string {
  return `article-${id}`;
}

// read a value from the cache
// returns either the cached value or undefined if key is unknown, or data is expired
export function readFromCache(key: string): any | undefined {
  console.log(`Reading from Cache with key: ${key}`);
  const store = Kv.openDefault();
  // return early with `undefined` if key is not known
  if (!store.exists(key)) {
    return undefined;
  }
  // load CacheData from the key value store
  const cacheData = store.getJson(key);
  // return either cached data or undefined if data is expired
  return onlyValidCacheData(cacheData);
};

// store value for ttl in the cache at key
export function storeInCache(key: string, value: any, ttl: number) {
  console.log(`Storing data in Cache at ${key}`);
  const store = Kv.openDefault();
  // create a CacheData instance and store it at position key
  store.setJson(key, buildCacheData(value, ttl));
  // because we modified the underlying data storage, we must check
  // if the list of all articles is in cache, if so, remove it
  if (key !== ALL_ARTICLES_CACHE_KEY && store.exists(ALL_ARTICLES_CACHE_KEY)) {
    console.log(`Invalidating data from Cache at ${ALL_ARTICLES_CACHE_KEY}`);
    store.delete(ALL_ARTICLES_CACHE_KEY);
  }
}

// remove item at position key from the cache
export function invalidate(key: string) {
  console.log(`Invalidating data from Cache at ${key}`);
  const store = Kv.openDefault();
  // if key exists, remove the cached data
  if (store.exists(key)) {
    store.delete(key);
  }
  // if a particular article was updated / removed from the cache
  // we must check and remove the list of all articles as well
  if (key !== ALL_ARTICLES_CACHE_KEY && store.exists(ALL_ARTICLES_CACHE_KEY))
    console.log(`Invalidating data from Cache at ${ALL_ARTICLES_CACHE_KEY}`);
    store.delete(ALL_ARTICLES_CACHE_KEY);
  }
}

// creates a new instance of CacheData
// ttl defines when data will expire
const buildCacheData = (data: any, ttl: number): CacheData => {
  return {
    expiresAt: new Date(Date.now() + ttl * 60 * 1000).toISOString(),
    data: data
  } as CacheData;
}

// If cacheItem is expired, this function will return `undefined`
// otherwise, the containing data will be returned to the callee
const onlyValidCacheData = (cacheItem: CacheData): any | undefined => {
  const now = new Date();
  const expiresAt = new Date(cacheItem.expiresAt);
  if (now > expiresAt) {
    return undefined;
  }
  return cacheItem.data;
}
Having all caching capabilities implemented, we must integrate it with the existing CRUD handlers. Before modifying each handler function, bring necessary constants and functions into scope by adding the following line at the beginning of src/index.ts:
import {
	ALL_ARTICLES_CACHE_KEY,
	buildKey,
	invalidate,
	readFromCache,
	storeInCache
} from './cache';
Again, let’s cycle through all the handlers and update their implementation as shown in the snippets below. Start with the readArticles handler responsible for returning the list of all articles:
const readArticles = async (config: Config): Promise<Response> => {
  const cached = readFromCache(ALL_ARTICLES_CACHE_KEY);
  if (cached) {
    return json(cached, { status: 200, headers: { 'x-served-via-cache': 'true' } });
  }

  // existing code from readArticles ...

  storeInCache(ALL_ARTICLES_CACHE_KEY, data, config.cacheTtl);
  return json(data, { status: 200 });
}
Reading a particular article using it’s identifier is next:
const readArticleById = async (id: string, config: Config): Promise<Response> => {
  const cacheKey = buildKey(id);
  const cached = readFromCache(cacheKey);
  if (cached) {
    return json(cached, { status: 200, headers: { 'x-served-via-cache': 'true' } });
  }

  // existing code from readArtilceById

  storeInCache(cacheKey, data, config.cacheTtl);
  return json(data, { status: 200 });
}
When creating a new article, we must ensure it’s added to the cache and the list of all articles must be invalidated:
const createArticle = async (requestBody: ArrayBuffer, config: Config): Promise<Response> => {

  // existing code from createArticle ...

  const cacheKey = buildKey(data.id);
  storeInCache(cacheKey, data, config.cacheTtl);
  return json(data, { status: 201 });
}
Updating an existing article should store the updated article in the cache and invalidate the list of all articles in the cache as well:
const updateArticleById = async (id: string, requestBody: ArrayBuffer, config: Config): Promise<Response> => {

  // existing code from updateArticleById ...

  storeInCache(buildKey(id), data, config.cacheTtl)
  return json(data, { status: 200 });
}
Finally, removing an article from the database should remove it from the cache as well and invalidate the list of all articles:
const deleteArticleById = async (id: string, config: Config): Promise<Response> => {

  // existing code from deleteArticleById ...

  invalidate(buildKey(id))
  return new Response(null, { status: 204 });
}
Deploying to Fermyon Wasm Functions
To deploy the application to Fermyon Wasm Functions, use the spin aka deploy command. Necessary application variables (supabase_url and supabase_key) must be passed using the --variable flag:
$ spin aka deploy --variable supabase_url="<YOUR_SUPABASE_URL>" \
    --variable supabase_key="<YOUR_SUPABASE_KEY>"
Name of new app: supabase-proxy
Creating new app supabase-proxy in account your-account
Note: If you would instead like to deploy to an existing app, cancel this deploy and link this workspace to the app with `spin aka app link`
OK to continue? yes
Workspace linked to app supabase-proxy
Waiting for app to be ready... ready

App Routes:
- supabase-proxy: https://ec8a19d8-6d10-4056-bb69-cc864306b489.aka.fermyon.tech (wildcard)
Testing the Application
Let’s test the application by sending arbitrary requests to the app with curl.
$ export APP_URL=https://b4208b18-5dbf-4408-8555-5779881b7207.aka.fermyon.tech

$ curl -iX GET $APP_URL/articles
For the first invocation, we expect to see the list of articles. Double-check the response headers, we shall not see a x-served-by-cache header for the first invocation.
HTTP/1.1 200 OK
Content-Type: application/json; charset=utf-8
x-envoy-upstream-service-time: 739
Server: envoy
Date: Thu, 13 Feb 2025 15:55:47 GMT
Content-Length: 1090
Connection: keep-alive
Set-Cookie: akaalb_fwf-prod-apps=~op=fwf_prod:fwf-apps-fr-par|~rv=75~m=fwf-apps-fr-par:0|~os=1231e1ede8704e97468b2ddc2c84cd5b~id=b666132848cbc51812be74811328308e; path=/; HttpOnly; Secure; SameSite=None
Akamai-GRN: 0.0b4f1002.1739462146.bceb86b

[{"id":"57d636ad-b5d3-40a4-8b15-34326fc4553b","created_at":"2025-02-13T14:18:47.358804+00:00","title":"Another hello 3","content":"Hey I am also here as an author","published":false},{"id":"3a7cc280-7684-4c16-ada4-eba4c29fd486","created_at":"2025-02-12T09:54:07.655385+00:00","title":"The impressive benefits of usign WebAssembly on the Client","content":"In this article we will explore the benefits of using WebAssembly on the client","published":false},{"id":"d126fc4d-e360-4cbb-964d-ef4457e51009","created_at":"2025-02-12T09:52:37.457362+00:00","title":"The impressive benefits of usign WebAssembly in the Cloud","content":"In this article we will explore the benefits of using WebAssembly in the Cloud","published":false},{"id":"65d1f1e4-88f4-4823-8e78-2604056f283b","created_at":"2025-02-11T15:49:28.462493+00:00","title":"How to Learn X in Y Minutes","content":"How to learn tech topics fast","published":false},{"id":"82737e74-786b-4544-b1dd-91ed6e024422","created_at":"2025-02-11T15:49:07.30648+00:00","title":"Hello World","content":"This is our first article","published":false}]
Sending a secondary request to the same endpoint, should return the same response payload, however this time, we expect the x-served-by-cache header to be part of the response:
$ curl -iX GET $APP_URL/articles
Which should generate an output similar to this:
HTTP/1.1 200 OK
x-served-via-cache: true
Content-Type: application/json; charset=utf-8
x-envoy-upstream-service-time: 440
Server: envoy
Date: Thu, 13 Feb 2025 15:55:49 GMT
Content-Length: 1090
Connection: keep-alive
Set-Cookie: akaalb_fwf-prod-apps=~op=fwf_prod:fwf-apps-fr-par|~rv=11~m=fwf-apps-fr-par:0|~os=1231e1ede8704e97468b2ddc2c84cd5b~id=34c25fe9dc812b3647e5b7090035a7fc; path=/; HttpOnly; Secure; SameSite=None
Akamai-GRN: 0.0a4f1002.1739462148.a574fbf

[{"id":"57d636ad-b5d3-40a4-8b15-34326fc4553b","created_at":"2025-02-13T14:18:47.358804+00:00","title":"Another hello 3","content":"Hey I am also here as an author","published":false},{"id":"3a7cc280-7684-4c16-ada4-eba4c29fd486","created_at":"2025-02-12T09:54:07.655385+00:00","title":"The impressive benefits of usign WebAssembly on the Client","content":"In this article we will explore the benefits of using WebAssembly on the client","published":false},{"id":"d126fc4d-e360-4cbb-964d-ef4457e51009","created_at":"2025-02-12T09:52:37.457362+00:00","title":"The impressive benefits of usign WebAssembly in the Cloud","content":"In this article we will explore the benefits of using WebAssembly in the Cloud","published":false},{"id":"65d1f1e4-88f4-4823-8e78-2604056f283b","created_at":"2025-02-11T15:49:28.462493+00:00","title":"How to Learn X in Y Minutes","content":"How to learn tech topics fast","published":false},{"id":"82737e74-786b-4544-b1dd-91ed6e024422","created_at":"2025-02-11T15:49:07.30648+00:00","title":"Hello World","content":"This is our first article","published":false}]
Bonus: Cache Invalidation upon External Data Modifications
Chances are pretty high, that other applications will also modify data in the Supabase database. Luckily, we could leverage the Integration capabilities provided by Supabase, to invalidate our cache whenever data in the database is modified using either the Supabase portal or any other third party application.
Open the Supabase portal, navigate to your project and open the Integrations page. From here select Postgres Modules and click the Database Webhooks button from the database page, find and click the Webhooks button.
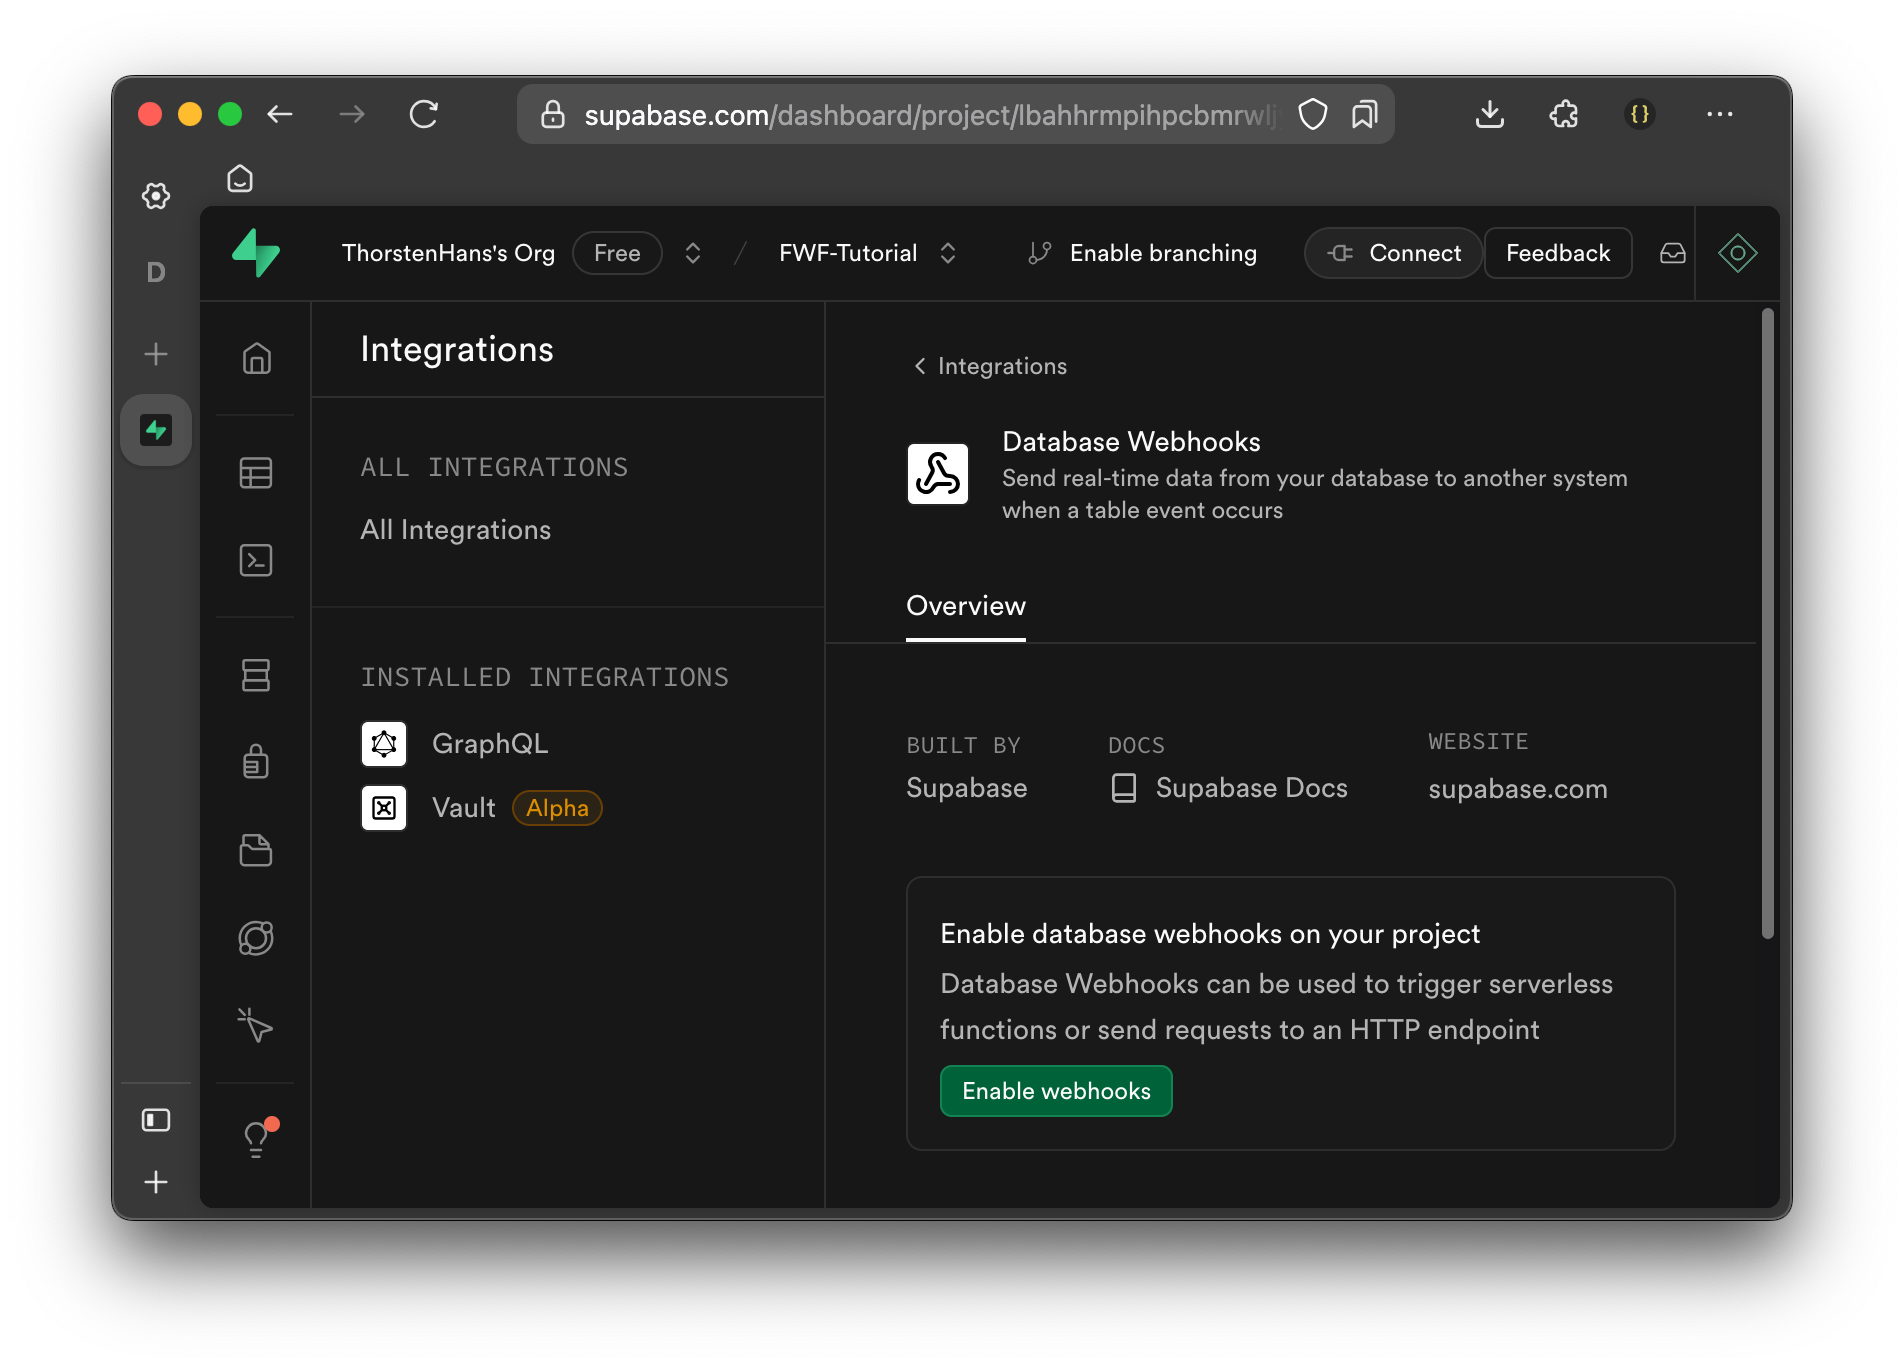
Database Webhooks must be enabled once per project, click the Enable Webhooks button to do so. Once enabled, navigate to the Webhooks tab and click the Create a new hook button.
Webhooks in Supabase offer quite some configuration capabilities, configure the new webhook using the following values:
| Property | Value | Description |
|---|---|---|
| Name | Call Spin App on Fermyon Wasm Functions | Unique Name for your webhook |
| Conditions to fire webhook | Table: articles Events: Insert, Update, Delete | Define the scope of this webhook (articles table) and ensure all event types are enabled |
| Webhook configuration | HTTP Request | Tell Supabase to send a HTTP request for events |
| HTTP Request Method | POST | Supabase should sent POST requests to our Spin App |
| HTTP Request URL | <YOUR_APP_URL>/inform | Provide the URL of your Spin application (You received it when deploying the app using spin aka deploy) . Ensure to add the /inform suffix |
| HTTP Headers | content-type: application/json x-webhook-token: <some_value> | Add a new HTTP header called x-webhook-token and set its value to a random value (e.g. a new UUID). Note down this value, as we need this when updating the app on Fermyon Wasm Functions |
Once you have customized all the properties of the webhook, click Create Webhook.
With the webhook configured in Supabase, we have to update our Spin application. Let’s introduce a new application variable called supabase_webhook_token and grant our application component access to the variable.
[variables]
# ...
supabase_webhook_token = { required = true, secret = true }

# ...

[component.supabase-proxy.variables]
# ...
supabase_webhook_token = ""
Update the Config interface and the withConfig function in src/middlewares.ts to load and expose the webhookToken:
import * as Variables from "@spinframework/spin-kv";
import { IRequest } from "itty-router";

export interface Config {
  url: string,
  key: string,
  cacheTtl: number,
  webhookToken: string,
}

export function withConfig(request: IRequest) {
  const url = Variables.get('supabase_url');
  const key = Variables.get('supabase_key');
  const ttl = +(Variables.get('cache_ttl') ?? "5");
  const webhookToken = Variables.get('supabase_webhook_token');

  if (!url || !key || !webhookToken) {
    throw new Error("Required Configuration data not set");
  }
  request.config = {
    url,
    key,
    cacheTtl: ttl,
    webhookToken
  } as Config;
}
Supabase will send necessary information about the event and affected records as payload of every webhook invocation. Although we could take that information into context, and provide an even more sophisticated implementation, let’s keep it simple for now. Depending on the actual event (INSERT, UPDATE, or DELETE), we’ll either:
- Remove the list of all articles from the cache (on
INSERT) - Remove the item of the affected article and the list of all articles from the cache (on
UPDATEandDELETE)
Again, let’s encapsulate the implementation, add a new TypeScript file at src/inform.ts and add the following content:
import { ALL_ARTICLES_CACHE_KEY, buildKey, invalidate } from "./cache"

interface InformPayload {
  type: string
  table: string
  record: ArticleLike | null,
  schema: string
  old_record: ArticleLike | null
}

interface ArticleLike {
  id: string
}

export function processDatabaseUpdate(requestBody: ArrayBuffer): Response {
  let payload;

  try {
    const decoder = new TextDecoder();
    payload = JSON.parse(decoder.decode(requestBody)) as InformPayload;
  }
  catch (error) {
    return new Response('Bad Requst', { status: 400 });
  }
  switch (payload.type.toLowerCase()) {
    case "insert":
      invalidate(ALL_ARTICLES_CACHE_KEY);
      return new Response(null, { status: 200 });
    case "update":
      invalidate(buildKey(payload.record!.id));
      return new Response(null, { status: 200 });
    case "delete":
      invalidate(buildKey(payload.old_record!.id));
      return new Response(null, { status: 200 });
    default:
      return new Response('Bad Request', { status: 400 });
  }
}
Finally, we could update src/index.ts to bring the processDatabaseUpdate function into scope, add a new route to the router instance, and call the processDatabaseUpdate function from within a new handler (onDatabaseUpdate). As part of this, we’ll also double-check if incoming requests have the x-webhook-tokenheader specified and pass the correct value:
import  processDatabaseUpdate  from './inform';

// ..

router // ...
  .post("/inform", async (req) => onDatabaseUpdate(req.headers, await req.arrayBuffer(), req.config as Config));

const onDatabaseUpdate = (headers: Headers, requestBody: ArrayBuffer, config: Config): Response => {
  const token = headers.get("x-webhook-token");
  if (!token || token !== config.webhookToken) {
    console.log("Webhook invoked without or with invalid token")
    return new Response(null, { status: 401 });
  }
  return processDatabaseUpdate(requestBody)
};
With all those changes in place, you can save the modifications, compile your source code to Wasm (spin build) and re-deploy the application to Fermyon Wasm Functions. In contrast to the initial deployment, we’ve to add the supabase_webhook_token variable and provide the value specified when creating the webhook over on Supabase:
$ spin aka deploy --variable supabase_url="\<YOUR_SUPABASE_URL\>" \
    --variable supabase_key="<YOUR_SUPABASE_KEY>" \
    --variable supabase_webhook_token="<YOUR_TOKEN>"
Deploying updated version of app supabase-proxy in account your-account (version 1 → 2)
OK to continue? yes
Waiting for app to be ready... ready

App Routes:
- supabase-proxy: https://ec8a19d8-6d10-4056-bb69-cc864306b489.aka.fermyon.tech (wildcard)
You can use the Supabase portal to insert, update, or delete records from the articles table. On the flip side use the spin aka logs command, to retrieve logs from your Spin application running on Fermyon Wasm Functions. The cache invalidation implementation will generate log messages that you could use to verify cache busting also works for database chances done by third party applications now.
$ spin aka logs
2025-02-13 14:50:54 [supabase-proxy]  Storing data in Cache at all-articles
2025-02-13 14:50:54 [supabase-proxy]  Reading from Cache with key: all-articles
2025-02-13 14:51:17 [supabase-proxy]  Invalidating data from Cache at article-46d94d5d-28db-47b8-b901-95bb0962705d
2025-02-13 14:51:17 [supabase-proxy]  Invalidating data from Cache at all-articles
Summary
By completing this tutorial, you have successfully built and deployed a Spin application that caches data from Supabase using the no-ops Key Value Store powered by Fermyon Wasm Functions. Here’s what you’ve accomplished:
- ✅ Set Up Supabase – You provisioned a Supabase database, created a table for articles, and seeded it with sample data.
- ✅ Developed a Spin App – You built a web service using Spin with TypeScript, implementing CRUD endpoints for managing articles.
- ✅ Integrated Supabase – You connected your app to Supabase using the
@supabase/supabase-jsclient to fetch and manipulate data. - ✅ Implemented Caching – You optimized performance by adding a caching layer with Spin’s Key Value store, reducing redundant database queries.
- ✅ Enabled Cache Invalidation – You ensured data consistency by implementing cache invalidation when articles were added, updated or deleted.
- ✅ Deployed to Fermyon Wasm Functions – You successfully deployed your application and tested it using curl, confirming that caching works as expected.
- ✅ Added Webhook Support – You leveraged Supabase Database webhooks to detect external data modifications and automatically invalidate the cache.
Now, your application is optimized for fast and efficient data retrieval while maintaining real-time consistency.
Great job! 🚀
You can find the source code of the app built as part of this tutorial in the Fermyon Wasm Functions example repository